I’ve always believed that nothing beats the aroma of French bread baking in the oven, filling my kitchen with that irresistible, yeasty scent.
You might think crafting this classic loaf requires special equipment or professional skills, but I’m here to tell you it’s surprisingly simple.
With just five basic ingredients and a little patience, you can transform your kitchen into a Parisian bakery. The secret lies in the technique—how you handle the dough makes all the difference between a good loaf and a magnificent one.

Why You’ll Love this Homemade French Bread
Simplicity is the secret weapon of this French bread recipe. With just five basic ingredients, you can create bakery-quality loaves right in your kitchen.
I’m talking crusty exterior, soft interior, and that unmistakable yeasty aroma filling your home.
What makes this recipe special? The high water-to-flour ratio creates those gorgeous air pockets everyone loves.
Plus, you won’t need fancy equipment—just your hands and an oven.
Can you imagine serving warm, fresh-baked bread at your next dinner? The looks on everyone’s faces when they taste it, still warm and crackling.
Pure magic.
What Ingredients are in Homemade French Bread?
The beauty of French bread lies in its simplicity, requiring just a handful of basic pantry staples that transform into something extraordinary.
- 2¼ teaspoons active dry yeast
- 1 teaspoon sugar
- 1¾ cups lukewarm water
- 3½ cups bread flour (though you may need slightly less)
- 1 teaspoon salt
Quality matters with such a short ingredient list, so consider using filtered water if your tap water has a strong taste, and make sure your yeast is fresh—old yeast can lead to dense, disappointing loaves that refuse to rise properly.
How to Make this Homemade French Bread
Step 1: Activate the Yeast
In a large bowl, combine 2¼ teaspoons active dry yeast with 1 teaspoon sugar and 1¾ cups lukewarm water.
Let this mixture sit for about 5 minutes until it becomes frothy and bubbly—this is how you know your yeast is alive and ready to work its magic.
Step 2: Begin Forming the Dough
Add 2 cups of bread flour to the frothy yeast mixture and stir until a shaggy, wet dough forms.
The dough will look messy at this stage, but that’s perfectly normal, even desirable for creating those lovely air pockets later.
Step 3: Add Remaining Ingredients
Gradually incorporate the remaining flour (about 1½ cups more) and 1 teaspoon salt, adding just enough flour to form a workable dough.
Remember, a slightly tacky dough makes for better bread than one that’s dry and stiff—resist the urge to add too much flour.
Step 4: Knead the Dough
Turn the dough onto a lightly floured surface and knead for 8-10 minutes until smooth and elastic.
The dough should feel soft and slightly tacky, but not sticky enough to coat your fingers.
When you press it with your finger, it should spring back slowly.
For effortless kneading, a quality stand mixer can save you time and energy while ensuring perfectly developed gluten.
Step 5: Let the Dough Rise
Place your dough in a lightly oiled bowl, turning once to coat, then cover with a damp cloth or plastic wrap.
Let it rise in a warm spot until doubled in size, about an hour.
The dough has properly risen when you can poke it with your finger and the indentation remains.
Step 6: Shape Your Loaves
Gently punch down the risen dough to release air bubbles, then divide and shape into your preferred loaf style—a classic baguette, boule, or batard.
Using a sharp knife or baker’s lame, cut several diagonal slashes across the top to allow for expansion during baking.
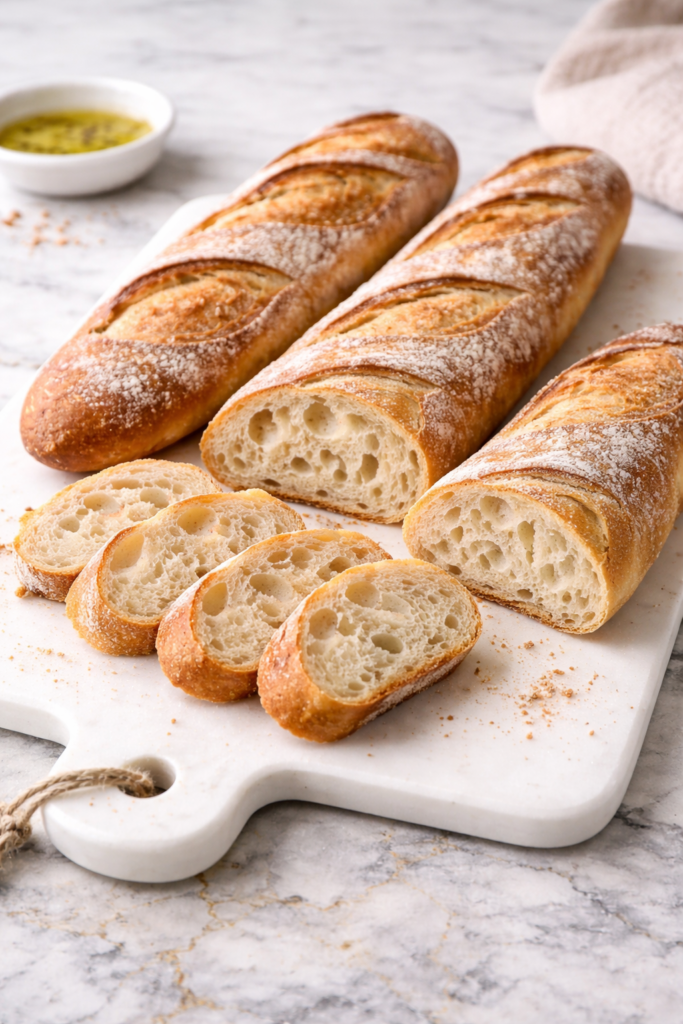
Step 7: Bake to Golden Perfection
Preheat your oven to 425°F (220°C) and place a pan of water on the bottom rack to create steam.
Bake your loaves for 20-25 minutes until the crust is golden brown and the bread sounds hollow when tapped on the bottom.
That crackling sound as it cools? That’s the mark of perfect French bread.
Step 8: Cool Before Slicing
Allow your freshly baked bread to cool on a wire rack for at least 15 minutes before slicing.
I know it’s tempting to tear into that warm loaf right away—the aroma is practically torture—but the texture will be much better if you give the starches time to set.
What to Serve with Homemade French Bread
Is there anything more versatile than a fresh loaf of French bread? This crusty-on-the-outside, tender-on-the-inside staple practically begs for good company.
Slice it alongside a hearty beef stew or French onion soup, where it’s perfect for sopping up those rich broths. For lunch, split it lengthwise for the most amazing garlic bread—just slather with butter, minced garlic, and herbs before toasting.
A simple olive oil and balsamic vinegar dipping sauce transforms it into an elegant appetizer.
And don’t forget breakfast possibilities—thick slices make incredible French toast with a sprinkle of cinnamon and powdered sugar. For something lighter, pair with a fresh garden salad and a glass of crisp white wine for a simple yet satisfying meal.
Homemade French Bread Substitutions and Variations
• Flour Options: All-purpose flour works in a pinch, though the texture won’t be quite as chewy.
For a heartier loaf, substitute up to 1 cup of whole wheat flour (you may need extra water).
• Yeast Alternatives: Instant yeast can replace active dry (use the same amount, but skip the proofing step).
No yeast? Try a sourdough starter instead—use ½ cup and reduce water accordingly.
- Dietary Adjustments: For gluten-free bread, use a 1:1 gluten-free flour blend plus 1 tsp xanthan gum, but expect a denser result.
- Flavor Boosters: Fold in roasted garlic, herbs (rosemary, thyme, oregano), or olives before shaping.
For extra depth, add 1 tbsp olive oil to the dough.
• Finishing Touches: Brush with egg wash for shine, sprinkle with sesame or poppy seeds, or dust with cornmeal before baking for rustic appeal.
Leftovers and Storage for this Homemade French Bread
French bread is at its absolute peak when fresh from the oven, still warm with that irresistible crackly crust.
But don’t worry if you can’t finish it all at once—proper storage makes a world of difference.
- Same-day storage: Keep at room temperature in a paper bag or wrapped in a clean kitchen towel. The crust will soften slightly but maintains decent texture.
- Longer storage: For 2-3 days, store in an airtight container. The crust will soften considerably, but the bread remains tasty.
- Freezing option: Wrap tightly in plastic wrap, then foil, and freeze for up to 1 month.
- Reviving stale bread: Sprinkle with water and heat in a 350°F oven for 5-10 minutes. The crust will re-crisp beautifully, almost like fresh-baked.
Final Thoughts
There’s something almost magical about the aroma of French bread baking in your kitchen. With just five basic ingredients and a bit of patience, this recipe delivers that perfect combination of crackling crust and tender, airy interior that often seems impossible to achieve at home.
It’s an ideal weekend project when you have a few hours to let the dough rise while you go about other activities.
This bread pairs beautifully with everything from a hearty soup to a simple smear of salted butter. In a world of complicated recipes and exotic ingredients, sometimes the simplest things—like a warm slice of homemade French bread—bring the most profound satisfaction.