
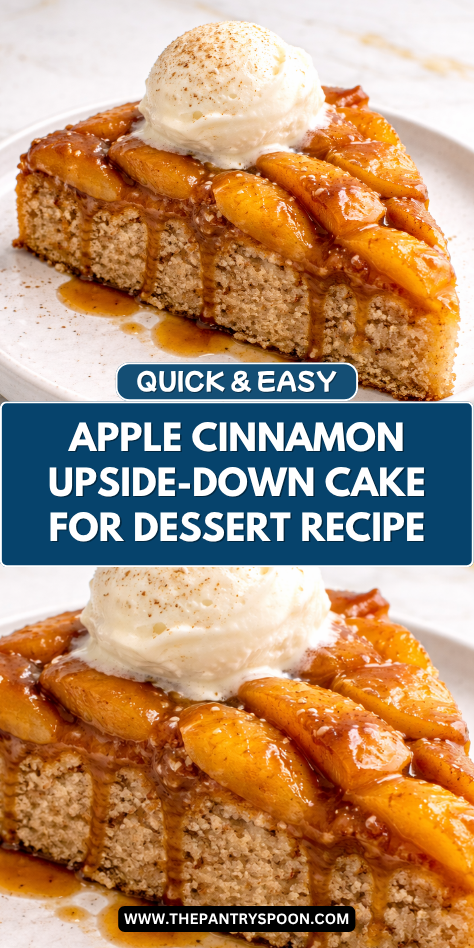
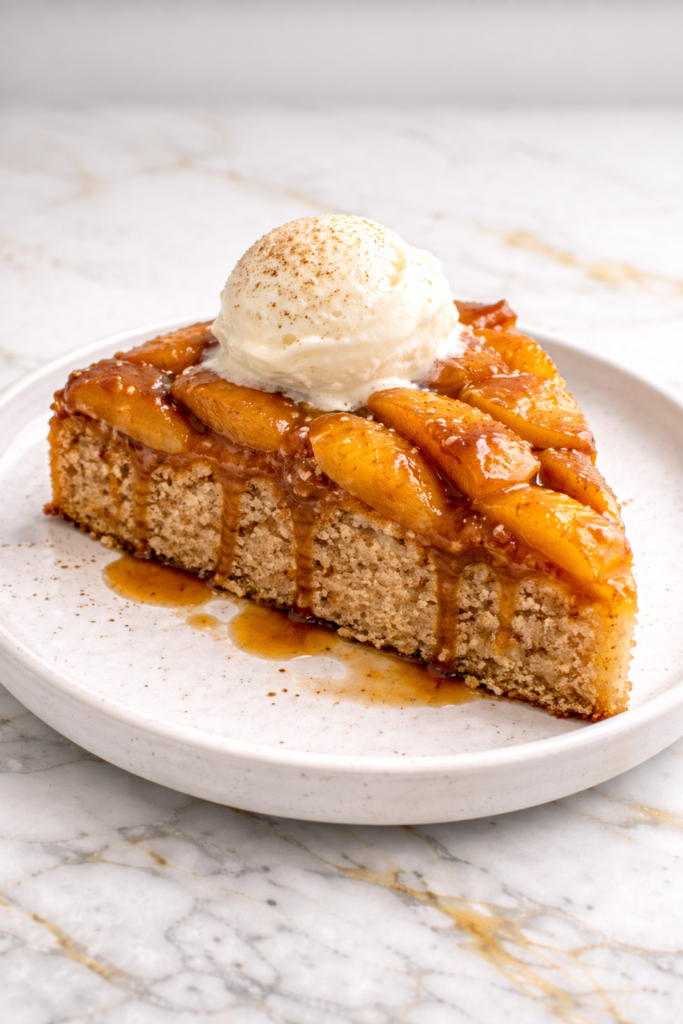
I love upside-down cakes because they look fancy but are actually one of the easiest desserts to make. You just arrange sliced apples in a pan with butter and brown sugar, pour cake batter on top, and flip it over when it’s done.
I’ll walk you through how to get the apples caramelized and sticky without them turning mushy or burning.
The cinnamon in the cake adds warmth, and the whole thing smells incredible while it bakes. Serve it warm with vanilla ice cream or whipped cream, and people will think you spent way more effort than you actually did.
Why You’ll Love This Recipe
This cake is rich in flavor, with sweet, tender apples and warm cinnamon creating a perfect balance. The upside-down style gives it a beautiful presentation with minimal effort.
It’s also easy to make using simple ingredients you likely already have on hand. The process is straightforward, making it a great option for both beginner and experienced bakers.
Another reason this recipe stands out is its versatility. It works well as a dessert, a snack, or even a special breakfast treat.
Serves: 8–10 people
This recipe makes one 9-inch cake, which serves about eight to ten slices. It’s easy to double if you’re baking for a larger group.
Ingredients You’ll Need
For the apple topping:
- 3 medium apples, peeled, cored, and sliced
- ¼ cup unsalted butter
- ½ cup brown sugar
- 1 teaspoon ground cinnamon
For the cake batter:
- 1½ cups all-purpose flour
- 1 teaspoon baking powder
- ½ teaspoon baking soda
- ½ teaspoon salt
- 1 teaspoon ground cinnamon
- ½ teaspoon ground nutmeg
For the wet ingredients:
- ½ cup unsalted butter, softened
- ¾ cup granulated sugar
- 2 large eggs
- 1 teaspoon vanilla extract
- ½ cup milk or buttermilk
Pro Tips
Slice the apples evenly so they cook at the same rate and create a uniform topping. This also helps with presentation when the cake is flipped.
Use a mix of apple varieties for more complex flavor. A combination of sweet and tart apples works especially well.
Melt the butter and sugar fully for the topping to create a smooth caramel layer. This ensures the apples become soft and glossy.
Do not overmix the batter once the flour is added. Mixing just until combined keeps the cake tender.
Let the cake cool slightly before flipping, but not too long. This helps release the topping cleanly without sticking.
Run a knife around the edges before inverting to make sure the cake comes out easily. This prevents tearing.
Tools You’ll Need
- 9-inch round cake pan
- Mixing bowls
- Hand mixer or stand mixer
- Whisk
- Spatula
- Cutting board
- Sharp knife
- Measuring cups and spoons
Substitutions and Variations
You can substitute pears for apples for a slightly different flavor. They create a softer, more delicate topping.
If you prefer a dairy-free version, use plant-based butter and milk. The cake will still be moist and flavorful.
For added texture, sprinkle chopped nuts like pecans or walnuts over the apple layer before adding the batter. This adds a nice crunch.
You can also add a drizzle of caramel sauce after baking for extra sweetness. This enhances the overall flavor.
For a deeper spice profile, include a pinch of cloves or allspice. This creates a richer, more aromatic cake.
Make Ahead Tips
This Apple Cinnamon Upside-Down Cake is a wonderful option to prepare ahead, especially for gatherings or busy days. You can bake the cake a day in advance and store it covered at room temperature.
If you prefer, you can refrigerate the cake for up to 3 days. Just be sure to bring it to room temperature or warm it slightly before serving for the best texture.
You can also prepare the apple topping ahead of time and store it in the refrigerator. When ready to bake, simply reheat it slightly and assemble the cake.
For longer storage, the cake can be frozen after baking. Wrap it tightly and freeze for up to 2 months, then thaw before serving.
Instructions
Step 1: Preheat the Oven
Preheat your oven to 350°F (175°C) and lightly grease a 9-inch round cake pan. This helps prevent sticking and ensures an easy release.
A properly preheated oven allows the cake to bake evenly. It also helps the batter rise correctly.
Step 2: Prepare the Apple Topping
In a saucepan, melt the butter over medium heat. Add the brown sugar and cinnamon, stirring until smooth and slightly thickened.
Pour this mixture into the prepared cake pan and spread it evenly. Arrange the sliced apples on top in a single layer.
Step 3: Mix Dry Ingredients
In a bowl, whisk together the flour, baking powder, baking soda, salt, cinnamon, and nutmeg. Mix until evenly combined.
Set aside while you prepare the wet ingredients. This keeps the process organized.
Step 4: Cream Butter and Sugar
In a large mixing bowl, beat the softened butter and granulated sugar until light and fluffy. This should take about 2–3 minutes.
This step helps create a soft and tender cake. It incorporates air into the batter.
Step 5: Add Eggs and Vanilla
Add the eggs one at a time, mixing well after each addition. Stir in the vanilla extract.
The mixture should be smooth and slightly creamy. This builds the base flavor.
Step 6: Combine Wet and Dry Ingredients
Gradually add the dry ingredients to the wet mixture, alternating with the milk. Mix until just combined.
Avoid overmixing to keep the cake light. The batter should be smooth.
Step 7: Assemble the Cake
Pour the batter over the apple layer in the pan. Spread it evenly to cover the apples completely.
This ensures the topping stays intact when flipped. Smooth the surface gently.
Step 8: Bake the Cake
Place the pan in the oven and bake for 35–40 minutes. The cake is done when a toothpick inserted into the center comes out clean.
Allow the cake to cool in the pan for about 10 minutes. This helps it set before flipping.
Step 9: Invert and Serve
Run a knife around the edges of the pan, then carefully invert the cake onto a serving plate. Lift the pan gently to reveal the apple topping.
Serve warm or at room temperature. The topping should be glossy and caramelized.
Serving Suggestions
This cake is delicious on its own, with the caramelized apple topping providing plenty of flavor. It’s perfect for a simple dessert.
You can serve it with a scoop of vanilla ice cream for a more indulgent option. The contrast of warm cake and cold ice cream is especially satisfying.
It also pairs well with whipped cream or a drizzle of caramel sauce. These additions enhance the sweetness.
For a lighter pairing, serve it with fresh fruit on the side. This adds a refreshing balance.
It’s also a great choice for brunch or afternoon tea. The warm spices make it feel cozy and inviting.
Leftovers and Storage
Store leftover cake in an airtight container at room temperature for up to 2 days. This helps maintain its texture.
For longer storage, refrigerate it for up to 4 days. Bring it to room temperature or warm slightly before serving.
To freeze, wrap the cake tightly in plastic wrap and place it in a freezer-safe container. Freeze for up to 2 months.
Thaw overnight in the refrigerator and reheat gently if desired. This helps restore its softness.
Avoid leaving the cake uncovered, as it can dry out. Proper storage keeps it moist and flavorful.
Nutrition and Benefits
- Apples provide natural sweetness along with fiber and vitamins. They contribute both flavor and nutrition.
- Using simple ingredients allows you to control the sweetness and quality of the dessert. This makes it a more wholesome option.
- The warm spices add depth of flavor without needing extra sugar. They enhance the overall experience.
- The cake can be adapted with alternative ingredients to suit different dietary needs. This makes it flexible.
- This dessert offers a comforting treat that feels satisfying without being overly heavy. It’s a balanced indulgence.
Recipe FAQ
What type of apples work best?
A mix of sweet and tart apples works best for balanced flavor. Varieties like Granny Smith and Honeycrisp are great options.
They hold their shape well during baking. This improves both texture and taste.
How do I prevent the topping from sticking?
Grease the pan well and avoid letting the cake cool too long before flipping. This helps release the topping easily.
Running a knife around the edges also helps. Flip carefully while still slightly warm.
Can I make this cake gluten-free?
Yes, you can use a 1:1 gluten-free flour blend. Make sure it’s suitable for baking.
The texture may vary slightly, but it will still be delicious. Follow the same steps.
Can I reduce the sugar?
Yes, you can slightly reduce the sugar without affecting the texture too much. The apples provide natural sweetness.
Adjust gradually to your preference. The flavor will still be good.
Can I add nuts?
Yes, chopped pecans or walnuts can be added to the topping. They provide a nice crunch.
Sprinkle them over the apples before adding the batter. This enhances texture.
Why is my cake dense?
Overmixing the batter can cause a dense texture. Mix just until combined.
Also, check that your leavening agents are fresh. This helps the cake rise properly.
Can I make this into muffins?
Yes, you can divide the batter into muffin tins with a small amount of topping at the bottom. Adjust baking time accordingly.
This makes the recipe more portable. It’s great for individual servings.
A Cozy Dessert with a Beautiful Finish
This Apple Cinnamon Upside-Down Cake brings together warm spices, tender cake, and a caramelized apple topping in one comforting dessert.
It’s simple to prepare, visually stunning, and perfect for sharing with family and friends. With its cozy flavor and timeless appeal, it’s a recipe you’ll come back to again and again.


