
I made my first lemon curd from scratch expecting it to be complicated, and I was honestly surprised by how simple it was. That bright, tangy filling poured into a buttery tart shell is one of those desserts that looks impressive but doesn’t ask much of you.
If you’ve been a little nervous about making curd, I’ll show you exactly how to get it smooth and silky every time.
A few basic ingredients and some patience at the stove is really all it takes. This one has become my go-to when I want something elegant without the stress.

Why You’ll Love This Recipe
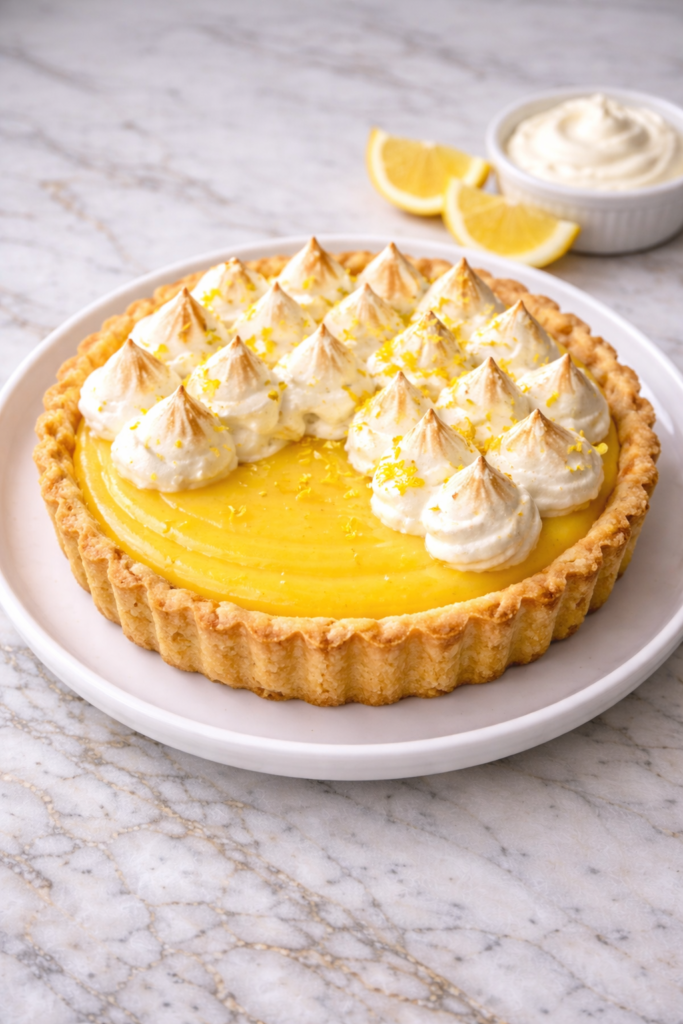
This lemon curd tart pie delivers a perfect combination of sweet and tangy flavors that feel light yet satisfying. The creamy filling has a silky texture that melts in your mouth, while the crust adds just the right amount of buttery crunch.
It’s also surprisingly simple to make, even for beginner bakers. With a few basic ingredients and clear steps, you can create a dessert that looks elegant and tastes like it came from a bakery.
Another reason this recipe stands out is its versatility for different occasions. Whether you’re serving it at a holiday gathering, a weekend dinner, or just as a treat for your family, it always feels appropriate and special.
Serves: 8 people
This lemon curd tart pie serves about eight people, making it ideal for sharing at family meals or small gatherings. The slices are rich and satisfying, so a little goes a long way.
If you need to serve more guests, you can easily make two pies or cut smaller slices. It’s also a great dessert to prepare ahead, so you’re not rushing at the last minute.
Ingredients You’ll Need
For the crust:
- 1 ¼ cups all-purpose flour
- ½ cup unsalted butter (cold, cubed)
- ¼ cup granulated sugar
- ¼ teaspoon salt
- 2–3 tablespoons cold water
For the lemon curd filling:
- 1 cup granulated sugar
- 3 large eggs
- 3 large egg yolks
- ½ cup fresh lemon juice (about 3–4 lemons)
- 1 tablespoon lemon zest
- ½ cup unsalted butter (cut into pieces)
Pro Tips
- Use fresh lemon juice rather than bottled for the best flavor. Fresh juice gives the tart a bright, natural taste that really stands out.
- Keep your butter cold when making the crust. This helps create a flaky texture that contrasts beautifully with the smooth filling.
- Don’t rush the curd when cooking it. Stir constantly over gentle heat to prevent curdling and achieve a silky consistency.
- Strain the lemon curd before filling the crust. This removes any bits of cooked egg or zest, giving you a perfectly smooth finish.
- Chill the tart completely before slicing. This allows the filling to set properly and makes cleaner, more defined slices.
- Use a tart pan with a removable bottom if possible. This makes it much easier to remove and serve without damaging the crust.
Tools You’ll Need
- Mixing bowls
- Whisk
- Measuring cups and spoons
- Saucepan
- Fine mesh strainer
- Rolling pin
- Tart pan or pie dish
- Spatula
- Knife
Substitutions and Variations
If you don’t have time to make a homemade crust, you can use a store-bought pie crust or even a graham cracker crust. This saves time while still delivering a delicious result.
For a slightly different flavor, you can mix in a bit of orange or lime juice with the lemon. This adds complexity while keeping the citrus profile bright and refreshing.
If you prefer a less sweet dessert, reduce the sugar slightly in the filling. The tartness of the lemon will still shine through beautifully.
You can also top the finished tart with whipped cream, fresh berries, or a light dusting of powdered sugar. These additions enhance both presentation and flavor without overwhelming the dessert.
Make Ahead Tips
This lemon curd tart pie is an excellent dessert to prepare ahead of time, especially when you’re planning for gatherings or busy days. You can make the crust a day in advance and store it covered at room temperature until you’re ready to fill it.
The lemon curd can also be prepared ahead and kept in the refrigerator for up to 3 days. When ready to use, gently rewarm it just enough to make it spreadable, then pour it into the prepared crust.
If you want to fully assemble the tart ahead of time, you can refrigerate it for up to 24 hours before serving. This actually helps the filling set even better and enhances the flavor.
For best results, wait to add any toppings like whipped cream or fruit until just before serving. This keeps everything fresh and visually appealing.
Instructions
Step 1: Prepare the Crust Dough
In a mixing bowl, combine the flour, sugar, and salt, stirring until evenly mixed. Add the cold, cubed butter and work it into the flour using your fingers or a pastry cutter until the mixture resembles coarse crumbs.
Add cold water one tablespoon at a time, mixing gently until the dough just comes together. Be careful not to overwork it, as this can make the crust tough.
Step 2: Chill and Roll the Dough
Form the dough into a disc and wrap it in plastic wrap, then refrigerate for at least 30 minutes. This helps relax the gluten and keeps the butter cold for a flaky texture.
Once chilled, roll the dough out on a lightly floured surface until it’s large enough to fit your tart pan or pie dish. Carefully transfer it, pressing it gently into the edges.
Step 3: Blind Bake the Crust
Preheat your oven to 375°F and prick the bottom of the crust with a fork to prevent bubbling. Line it with parchment paper and add pie weights or dried beans.
Bake for 15 minutes, then remove the weights and parchment and bake for another 10–12 minutes until lightly golden. Let the crust cool completely before adding the filling.
Step 4: Make the Lemon Curd
In a saucepan, whisk together the sugar, eggs, egg yolks, lemon juice, and lemon zest until smooth. Place the pan over medium-low heat and cook, stirring constantly, until the mixture thickens.
This process takes about 8–10 minutes, and the curd should coat the back of a spoon when ready. Remove from heat immediately to prevent overcooking.
Step 5: Add Butter and Strain
Stir in the butter pieces one at a time until fully melted and incorporated. This gives the curd its rich, silky texture.
Pour the mixture through a fine mesh strainer into a clean bowl to remove any lumps. This step ensures a smooth and professional-looking filling.
Step 6: Assemble and Chill
Pour the warm lemon curd into the cooled crust, spreading it evenly with a spatula. Smooth the top for a clean finish.
Refrigerate the tart for at least 2–3 hours, or until the filling is fully set. This step is essential for clean slices and the perfect texture.
Serving Suggestions
This lemon curd tart pie is best served chilled, allowing the filling to stay firm and refreshing. The cool, creamy texture makes it especially enjoyable after a hearty meal.
You can add a dollop of freshly whipped cream on each slice for a soft, creamy contrast. This balances the tartness and adds a touch of indulgence.
Fresh berries like strawberries, raspberries, or blueberries pair beautifully with the citrus flavor. They add both color and a natural sweetness that complements the tart.
For a simple presentation, dust the top lightly with powdered sugar just before serving. This adds a delicate finish without overpowering the flavor.
If you’re serving guests, consider slicing the tart into smaller portions. Its rich flavor means even a small piece feels satisfying.
Leftovers and Storage
Leftover lemon curd tart pie should be stored in the refrigerator to maintain its texture and freshness. Cover it loosely with plastic wrap or store it in an airtight container.
It will stay fresh for up to 3–4 days when properly stored. The flavor often deepens slightly over time, making it just as enjoyable the next day.
When storing, try to keep the tart whole rather than slicing it all at once. This helps prevent the filling from drying out.
Freezing is possible, but it may slightly affect the texture of the lemon curd. If you do freeze it, wrap it tightly and thaw in the refrigerator before serving.
Avoid leaving the tart at room temperature for extended periods. The creamy filling is best kept chilled for both safety and quality.
Nutrition and Benefits
- This dessert uses fresh lemon juice, which provides vitamin C and a bright, natural flavor. It’s a refreshing alternative to heavier desserts.
- Eggs in the curd add protein and contribute to the rich, smooth texture. They also help create a satisfying and balanced treat.
- The homemade crust allows you to control the ingredients and avoid unnecessary additives. This makes it a more wholesome option compared to store-bought desserts.
- Lemon zest adds concentrated citrus oils that enhance flavor without extra calories. It also contributes subtle aromatic notes.
- While it’s still a treat, this tart feels lighter than many cream-based desserts. Its balance of sweetness and acidity makes it less overwhelming.
Recipe FAQ
Can I use bottled lemon juice instead of fresh?
Fresh lemon juice is highly recommended for the best flavor and brightness. Bottled juice can taste slightly dull or artificial in comparison.
If needed, you can use bottled juice in a pinch, but try to include fresh zest. This helps improve the overall flavor.
Why didn’t my lemon curd thicken?
The most common reason is not cooking it long enough or using heat that is too low. The mixture needs consistent stirring and enough time to properly thicken.
It should coat the back of a spoon when ready. If it’s still thin, continue cooking gently while stirring.
Can I make this recipe gluten-free?
Yes, you can substitute the all-purpose flour with a gluten-free flour blend for the crust. Make sure it’s a blend designed for baking.
The filling itself is naturally gluten-free. This makes the recipe easy to adapt for different dietary needs.
How do I prevent the crust from getting soggy?
Blind baking the crust is key to preventing sogginess. Make sure it is fully baked and lightly golden before adding the filling.
Letting the crust cool completely also helps create a barrier. This keeps the filling from soaking into the crust.
Can I freeze lemon curd tart pie?
Yes, but the texture may change slightly after thawing. Wrap it tightly and freeze for up to one month.
Thaw it slowly in the refrigerator before serving. This helps maintain as much of the original texture as possible.
What’s the best way to get clean slices?
Use a sharp knife and wipe it clean between each cut. This prevents the filling from dragging and keeps the edges neat.
Chilling the tart thoroughly before slicing also helps. A well-set filling is much easier to cut cleanly.
Can I make mini tarts instead of one large pie?
Yes, this recipe works well for mini tarts or tartlets. Simply divide the dough and filling evenly among smaller pans.
Adjust the baking time slightly for the crust. The result is perfect for parties or individual servings.
A Bright and Refreshing Dessert to Share
This lemon curd tart pie brings a perfect balance of sweetness and citrus flavor that feels both refreshing and satisfying.
It’s a dessert that looks elegant yet comes together with simple, approachable steps.
With its smooth filling and buttery crust, it’s a recipe that fits beautifully into both special occasions and everyday moments.
It’s one of those treats that adds a little brightness to the table and leaves a lasting impression.


