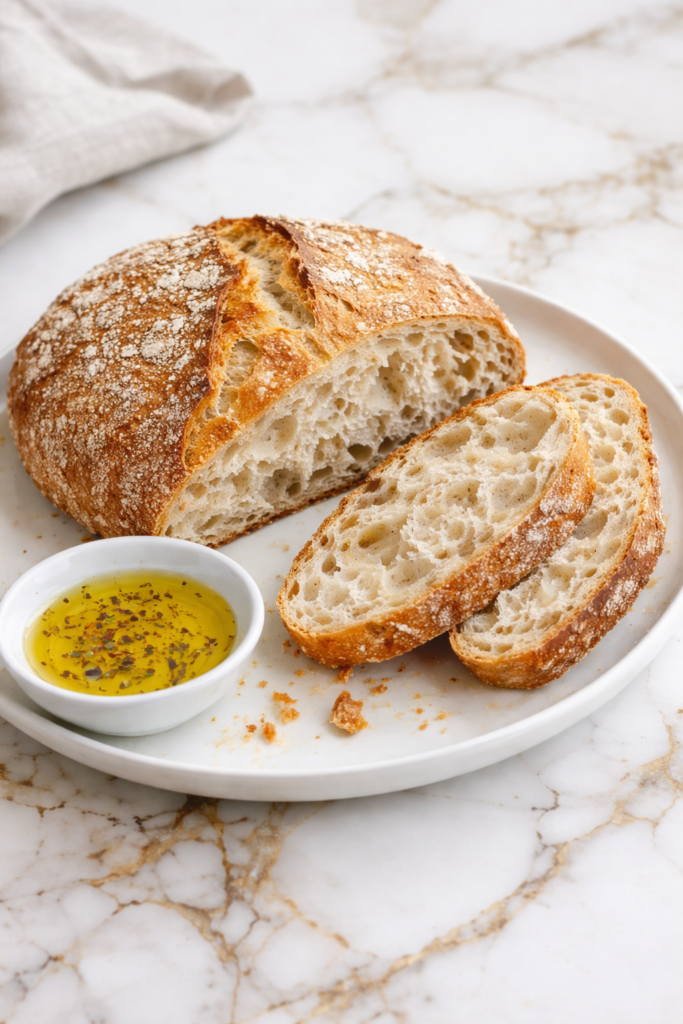
I always appreciate a bread recipe that feels impressive without being difficult, and No-Knead Artisan Loaf Bread is one I return to often. It uses simple pantry ingredients, needs very little hands-on work, and bakes into a loaf with a crisp crust and soft center.
When I want homemade bread without spending all day in the kitchen, this recipe is a dependable favorite. Few things make a home feel warmer than fresh bread cooling on the counter.
I love how this loaf fits into everyday life. I can stir the dough together the night before, let time do the work, and bake it the next day.
The smell alone makes the wait worthwhile, and the slices work for soups, sandwiches, or buttered toast. A recipe that gives such reliable results with so little effort always earns a place in my kitchen.

Why You’ll Love This Recipe
No-Knead Artisan Loaf Bread has the kind of texture many people hope for in homemade bread. The crust turns deeply golden and crisp, while the inside stays airy, chewy, and tender. It feels rustic and special, yet the ingredients are wonderfully basic.
This recipe is also ideal for busy home cooks. There is no long kneading session or complicated shaping process. Time does the hard work as the dough slowly rises and develops flavor.
I also like how flexible it is for family meals. Serve it warm with dinner, use leftovers for sandwiches, or toast slices the next morning. It is the kind of loaf that disappears quickly because everyone finds a way to enjoy it.
Serves: 10 people
This recipe makes one medium artisan loaf with about ten slices, depending on how thick you cut them. Thin slices are perfect for soups and sides, while thicker slices work well for toast and sandwiches. If serving a crowd, two loaves are easy to make in batches.
Ingredients You’ll Need
Main Ingredients
- 3 cups all-purpose flour
- 1 1/2 teaspoons salt
- 1/2 teaspoon instant yeast
- 1 1/2 cups warm water
Optional Add-Ins
- 1 tablespoon olive oil
- 1 teaspoon dried rosemary or thyme
- 1 tablespoon honey
- 1/4 cup shredded Parmesan cheese
- 1 tablespoon seeds such as sesame or pumpkin
For Dusting
- Extra flour or cornmeal for shaping
Pro Tips
- Measure flour carefully by spooning it into the cup and leveling it off. Too much flour can make the dough dry and dense. Proper measuring helps create the airy crumb this loaf is known for.
- Use warm water, not hot water. Water that is too hot can weaken or damage the yeast, while lukewarm water helps the dough rise steadily.
- Let the dough rest long enough. The long rise builds flavor and texture, so patience is one of the most important ingredients in this recipe.
- Preheat your baking pot fully before adding the dough. A hot Dutch oven creates steam that helps form a crisp crust and beautiful rise.
- Use plenty of flour on your hands and surface when shaping. The dough is sticky by design, and extra flour makes handling much easier.
- Let the loaf cool before slicing. Cutting too soon can make the inside gummy because steam is still finishing the baking process.
Tools You’ll Need
- Large mixing bowl
- Wooden spoon or spatula
- Plastic wrap or clean towel
- Measuring cups and spoons
- Parchment paper
- Dutch oven with lid or heavy oven-safe pot
- Cooling rack
- Sharp serrated knife
Substitutions and Variations
Try Whole Grain Flour
Replace up to 1 cup of the all-purpose flour with whole wheat flour. This adds a heartier flavor while keeping the loaf tender.
Make It Dairy-Free
This recipe is naturally dairy-free as written. If adding cheese, simply leave it out or use a dairy-free substitute.
Add More Flavor
Stir in dried herbs, garlic powder, or a spoonful of honey. Small additions can change the loaf while keeping the classic style.
Boost the Texture
Add seeds such as sesame, sunflower, or pumpkin seeds. They bring crunch and a wholesome feel to each slice.
Make It Heartier
Use the bread for sandwiches with eggs, turkey, or roasted vegetables. The sturdy slices hold fillings very well.
Make Ahead Tips
No-Knead Artisan Loaf Bread is one of the easiest breads to fit into a busy schedule because time does most of the work. You can mix the dough the night before, cover it, and let it rise at room temperature overnight. By the next day, the dough is ready to shape and bake with very little effort.
If your plans change, the dough can also be refrigerated after the first rise for up to two days. Cold storage slows fermentation while building even deeper flavor. Let it sit at room temperature for about 30 to 45 minutes before shaping.
You can also bake the loaf ahead and freeze slices once fully cooled. This gives you homemade bread ready for toast, sandwiches, or quick side servings anytime.
Instructions
Step 1: Mix the Dough
In a large bowl, combine the flour, salt, and instant yeast. Stir well so the yeast is evenly distributed through the flour.
Pour in the warm water and mix with a wooden spoon until no dry flour remains. The dough will look shaggy and sticky.
Step 2: First Rise
Cover the bowl with plastic wrap or a clean towel. Let the dough rest at room temperature for 12 to 18 hours.
The dough is ready when it looks puffy, bubbly, and doubled in size. Long rising creates flavor and airy texture.
Step 3: Prepare for Shaping
Lightly flour a clean work surface. Scrape the dough out of the bowl using a spatula.
Sprinkle a little flour over the top to make handling easier. The dough should still feel soft and sticky.
Step 4: Shape the Dough
Fold the edges of the dough toward the center a few times to create a round loaf shape. Turn it seam-side down.
Do not overwork the dough. Gentle shaping keeps the inside light and airy.
Step 5: Second Rise
Place the shaped dough on a sheet of parchment paper. Cover loosely with a towel and let it rest for 30 to 60 minutes.
During this time, the loaf will relax and puff slightly again.
Step 6: Preheat the Pot
While the dough rests, place a Dutch oven with its lid into the oven. Heat the oven to 450°F.
Let the pot preheat for at least 30 minutes. A fully hot pot helps create the signature crust.
Step 7: Transfer the Dough
Carefully remove the hot pot from the oven using oven mitts. Lift the dough by the parchment paper and lower it into the pot.
If desired, score the top with a sharp knife for a rustic look. Replace the lid immediately.
Step 8: Bake Covered
Bake covered for 30 minutes. The trapped steam helps the loaf rise high and keeps the crust from setting too early.
Avoid opening the lid during this stage.
Step 9: Bake Uncovered
Remove the lid and continue baking for 12 to 18 minutes. The loaf should become deep golden brown with a crisp crust.
If you prefer a darker crust, add a few extra minutes while watching closely.
Step 10: Cool the Bread
Carefully lift the loaf out of the pot and place it on a cooling rack. Let it cool for at least 1 hour before slicing.
Cooling fully helps the crumb set and prevents a gummy center.
Step 11: Slice and Serve
Use a serrated knife to slice the loaf. Serve warm, room temperature, or toasted.
This bread is delicious plain or with simple toppings.
Serving Suggestions
Serve warm slices with butter alongside soup, stew, or chili. The crisp crust and soft center are perfect for dipping.
Use thick slices for sandwiches with turkey, cheese, or roasted vegetables. The loaf is sturdy enough to hold fillings well.
Toast slices for breakfast and top with jam, honey, or peanut butter. It makes simple mornings feel special.
Cut cubes for homemade croutons or serve with olive oil for dipping. Both options are great for salads and pasta nights.
Pair with scrambled eggs and fruit for a hearty brunch plate. Fresh bread always adds comfort to the table.
Leftover slices also make excellent grilled cheese sandwiches.
Leftovers and Storage
Store the cooled loaf at room temperature in a paper bag, bread box, or loosely wrapped in a clean towel for up to two days. This helps preserve the crust better than sealing it tightly in plastic.
For softer storage beyond two days, place the bread in an airtight bag or container. The crust may soften, but the inside will stay pleasant and fresh.
To freeze, slice the loaf first and place parchment between slices if desired. Store in a freezer-safe bag for up to two months.
Thaw slices at room temperature or toast directly from frozen. To refresh a whole loaf, warm it in a 350°F oven for about 10 minutes.
Avoid refrigerating bread if possible, since it can dry out faster.
Nutrition and Benefits
- Homemade bread uses simple ingredients and avoids many unnecessary additives found in some packaged loaves.
- This recipe is low in hands-on effort, making fresh bread more realistic for busy families.
- The long rise develops flavor naturally without extra fats or sugars.
- Bread can be paired with proteins, vegetables, or healthy spreads for balanced meals.
- Freezing slices helps reduce waste and makes meal planning easier.
- Optional whole grain flour or seeds can add fiber and texture.
Recipe FAQ
Why is my dough so sticky?
No-knead dough is meant to be wetter than traditional bread dough. The extra moisture helps create an airy crumb and crisp crust. Use flour on your hands and surface when shaping.
Can I use active dry yeast instead of instant yeast?
Yes, use the same amount or slightly more. Dissolve it in the warm water first for best results. The rise time may be a little longer.
Do I need a Dutch oven?
A Dutch oven gives the best steam and crust, but another heavy oven-safe pot with a lid can work. Some bakers also use a baking stone with added steam in the oven.
Why is my bread dense?
Dense bread often comes from too much flour or not enough rise time. Make sure the dough looks bubbly and expanded before baking. Accurate measuring also matters.
Can I refrigerate the dough overnight?
Yes, the dough can be refrigerated after the first rise. Cold fermentation can improve flavor. Let it warm slightly before shaping.
How do I know when the loaf is done?
The crust should be deep golden brown and the loaf should sound hollow when tapped on the bottom. An internal temperature around 205°F to 210°F also works.
Can I add cheese or herbs?
Yes, add shredded cheese, dried herbs, roasted garlic, or seeds during mixing. Keep add-ins moderate so the dough still rises well.
A Rustic Loaf Worth Baking Again
No-Knead Artisan Loaf Bread proves that homemade bread can be simple, reliable, and deeply comforting. With just a few ingredients and very little hands-on work, it bakes into a loaf that feels special every single time.
Whether you serve it with dinner, toast it for breakfast, or use it for sandwiches, this bread fits naturally into family life. Keep this recipe close for those days when warm, fresh bread would make everything better.