
I’ve always found that a cake isn’t just dessert—it’s an opportunity for artistic expression. That’s exactly what makes this Painted Buttercream Cake so special. With its smooth, creamy canvas waiting for your creative touch and a vanilla base that promises to delight your taste buds, it’s where culinary craft meets artistry. No professional decorating skills required, just food coloring, a few brushes, and your imagination. The best part? Everyone’s face when you bring it to the table…
Why You’ll Love this Painted Buttercream Cake
While many desserts please the palate, this painted buttercream cake satisfies both your taste buds and creative spirit. It’s like getting to play with edible paints while creating something deliciously impressive.
I’m obsessed with how the smooth buttercream canvas takes color so beautifully. Can you imagine your guests’ faces when you reveal your masterpiece? The silky texture melts perfectly on your tongue, complementing the vanilla cake beneath.
What I adore most is the endless possibility for personalization—flowers for spring, abstract designs for modern celebrations, or themed imagery for birthdays. No artistic experience required, promise.
What Ingredients are in Painted Buttercream Cake?
Creating your own painted buttercream masterpiece requires surprisingly few ingredients, though each one plays a vital role in achieving that perfect canvas and vibrant colors.
- 1 cup unsalted butter, room temperature
- 3 1/2 cups powdered sugar
- 1/4 teaspoon salt
- 1 tablespoon heavy cream
- 1 1/2 teaspoons vanilla extract
- Gel food coloring (various colors)
- Vanilla cake layers (pre-baked and chilled)
I always recommend using high-quality gel food colorings rather than liquid ones, as they provide more intense colors without thinning your buttercream—think of them as concentrated watercolors for your edible canvas.
How to Make this Painted Buttercream Cake
Creating a painted buttercream cake might seem intimidating at first glance, but I promise the process is more approachable than you’d think. Start by whipping 1 cup of unsalted butter until it’s creamy and light, about 3-4 minutes. Gradually add in the 3 1/2 cups of powdered sugar, letting each addition incorporate fully before adding more. This patient approach prevents that dreaded sugar cloud in your kitchen (we’ve all been there).
Mix in 1/4 teaspoon salt, 1 tablespoon of heavy cream, and 1 1/2 teaspoons of vanilla extract, then beat until your buttercream is silky smooth.
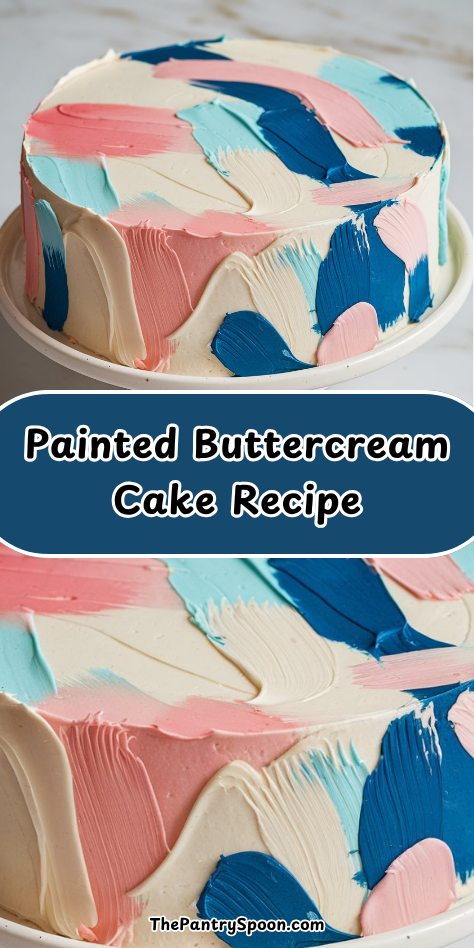
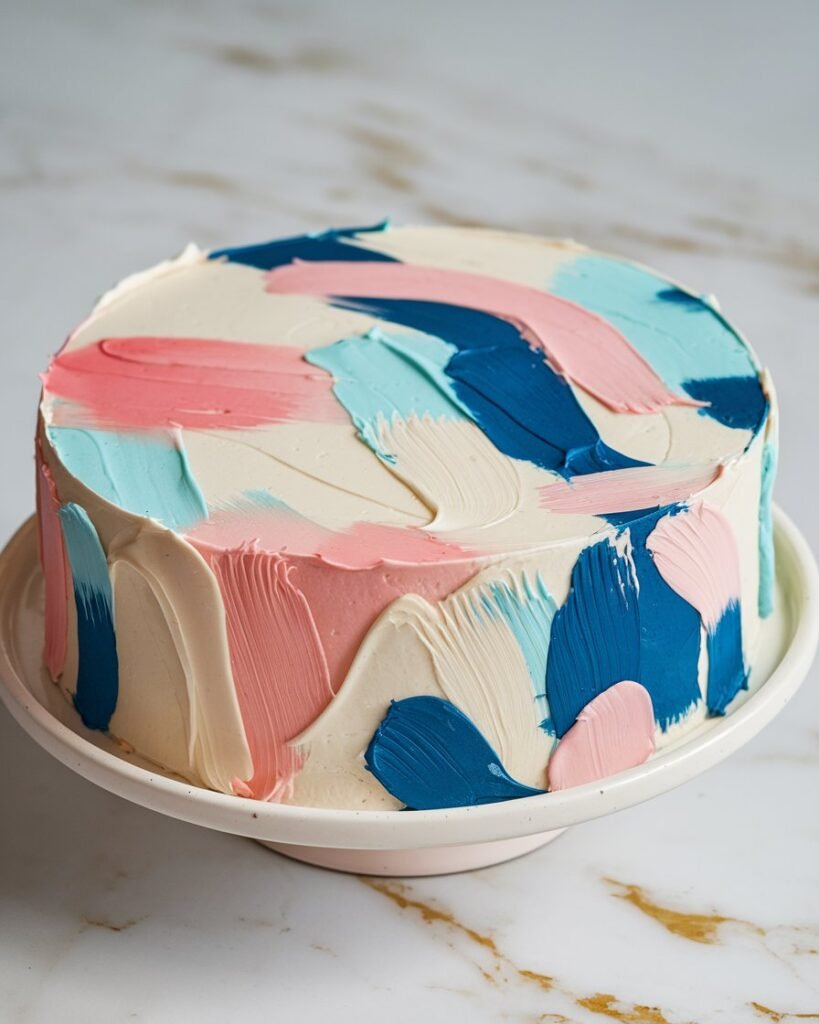
With your buttercream prepared, the real artistry begins. Make sure your cake layers are properly chilled—cold cake is much easier to work with. Apply a smooth base layer of white buttercream over your entire cake, creating your “canvas,” then refrigerate until this base becomes firm to the touch. Divide portions of your remaining buttercream into separate bowls and mix in gel food coloring to create your palette. Remember, less is more with gel colors; you can always add more, but you can’t take it away. Using clean artist brushes or palette knives, begin painting your design onto the chilled cake. A helpful technique? Start with background colors and work your way forward, just like a traditional painting.
For the most professional results, sketch your design beforehand and keep your cake cold throughout the decorating process. When the buttercream starts feeling soft, simply pop the cake back into the refrigerator for 10-15 minutes. This prevents colors from bleeding together and keeps your lines crisp. For the smoothest, most professional buttercream base, a KitchenAid Professional mixer will give you the consistent texture needed for perfect cake painting. The beauty of painted buttercream is that imperfections often add character—think of them as artistic flourishes rather than mistakes. And unlike traditional painting, if you truly dislike something, you can scrape it off and try again on a fresh layer of buttercream. Your finished cake will be both a delicious dessert and a stunning piece of edible art.
What to Serve with Painted Buttercream Cake
After spending time creating your edible masterpiece, you’ll want to serve it alongside complementary items that enhance the entire dessert experience. I recommend a scoop of vanilla bean ice cream, its creamy simplicity a perfect canvas for your artistic cake. Fresh berries add a pop of color and tartness that balances the buttercream‘s sweetness.
Hot beverages work wonders too. Think French press coffee or Earl Grey tea, their warm bitterness cutting through the rich cake. For something special, try a dessert wine like Moscato d’Asti—its gentle bubbles and honeyed notes are divine with buttercream.
Leftovers and Storage for this Painted Buttercream Cake
Most painted buttercream cakes taste even better the next day, after the flavors have had time to meld together. I’m a firm believer in the magic that happens in the refrigerator overnight—those vanilla notes deepen, and the butter mellows beautifully.
To store leftovers, cover exposed cake sections with plastic wrap (touching the buttercream directly) to prevent that dreaded dry-out. Then refrigerate for up to 5 days.
Want longer storage? The freezer’s your friend. Slice individual portions, wrap tightly, and freeze for up to 3 months. Just thaw in the fridge overnight. Wouldn’t it be nice to have cake on demand?
Painted Buttercream Cake Substitutions and Variations
Now that we’ve sorted out how to keep your masterpiece fresh, let’s talk about making this recipe truly your own.
Can’t find heavy cream? Regular milk works in a pinch, though the frosting won’t be quite as rich. Vegan? Plant-based butter and coconut cream make fantastic dairy-free alternatives. For flavors, try almond extract instead of vanilla, or add a tablespoon of citrus zest for a bright twist.
The real fun comes with design variations. Think watercolor washes using diluted gel colors, geometric patterns with tape guidelines, or even textured impasto techniques by applying thicker buttercream with a palette knife.
Final Thoughts
Three simple words sum up the painted buttercream cake experience: worth every minute. When I see the joy on someone’s face as they admire a cake that’s truly one-of-a-kind, I’m reminded why this technique is so special.
The beauty of painted buttercream lies in its accessibility—you don’t need to be Picasso to create something memorable. With patience, practice, and plenty of chilling time, anyone can transform a simple dessert into edible art.
Like with butter cookies recipe, proper chilling time is essential to achieving the perfect consistency for decorating your masterpiece.


