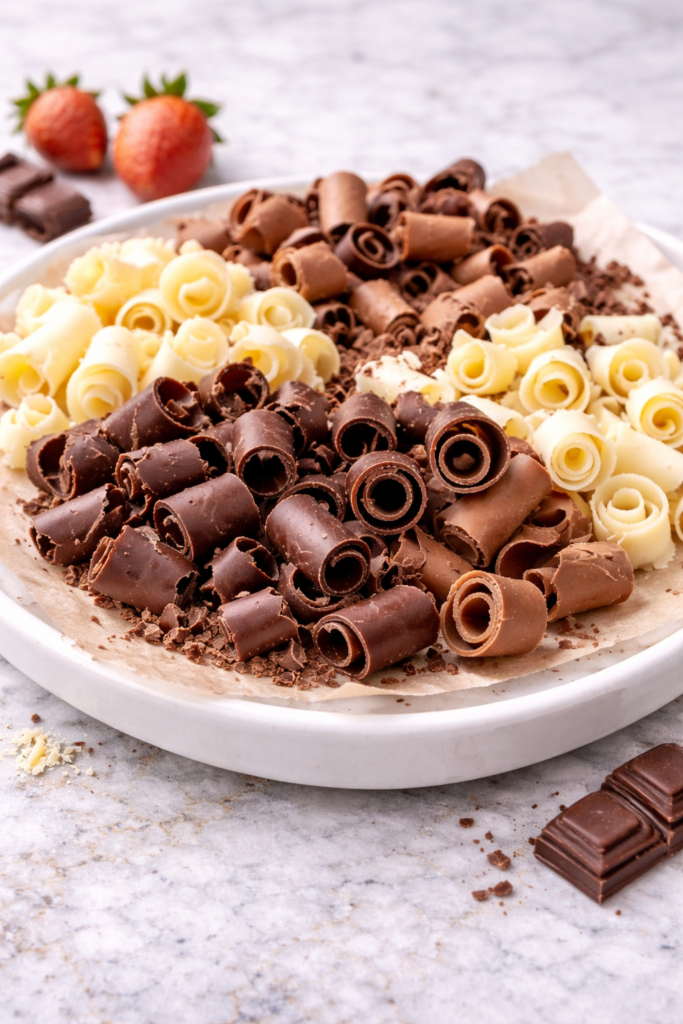
I’m so excited to share these chocolate curls with you—they’re the secret weapon in my dessert arsenal!
You know those fancy restaurant desserts with perfect chocolate decorations? You can make those at home with just chocolate and butter. It’s simpler than you might think, and the results are absolutely stunning.
These elegant curls transform ordinary cakes and ice cream into showstoppers that’ll have everyone wondering about your professional pastry training. Ready to discover how easy it is to add that wow factor?
Why You’ll Love these Chocolate Curls
Elegance in simplicity. That’s what these chocolate curls deliver to your desserts with minimal effort.
I’m talking about those gorgeous, delicate spirals that make any cake, mousse, or ice cream look like it came straight from a fancy bakery.
They’re surprisingly easy to create at home, using just chocolate and a touch of butter.
No special equipment needed, just your basic kitchen tools.
The best part? You can customize them to your taste—dark, milk, or white chocolate all work beautifully.
And let’s be honest, the broken pieces make for perfect chef’s treats while you work!
What Ingredients are in Chocolate Curls?
You only need two simple ingredients to create these impressive chocolate decorations that will transform your desserts from homemade to high-end.
- 2 to 4 ounces semi-sweet or bittersweet chocolate (you can also use milk or white chocolate if you prefer)
- 2 teaspoons butter or shortening (this helps make the chocolate more pliable)
The quality of chocolate makes a difference here, so I recommend using the best you can afford—those fancy chocolate bars from the baking aisle rather than basic chips will give you better flavor and texture for your curls.
How to Make these Chocolate Curls
Step 1: Melt the Chocolate
Combine 2-4 ounces of semi-sweet or bittersweet chocolate with 2 teaspoons of butter in a microwave-safe bowl.
Heat on low power (20-30%) in short bursts, stirring between each interval until completely smooth and glossy.
Step 2: Spread the Mixture
Pour your melted chocolate mixture onto the back of a clean baking sheet, then use a spatula to spread it into a very thin, even layer.
The thinner you spread it, the more delicate your curls will be—think paper-thin for those professional-looking decorations.
Step 3: Chill Briefly
Place the baking sheet in the freezer for about 3-4 minutes.
This timing is essential, folks—you want the chocolate just firm enough to hold shape but still pliable enough to curl without breaking.
Step 4: Test for Readiness
Touch the chocolate lightly with your fingertip; it should feel cool and set but leave a slight impression.
If it’s too soft, it’ll smear; too hard, and it’ll shatter into shards (which, honestly, still make pretty decorations in a pinch).
Step 5: Create the Curls
Hold a metal spatula or bench scraper at a 45-degree angle and push gently across the surface of the chocolate.
With the right pressure and temperature, the chocolate will naturally curl up as you push forward—it’s like watching magic happen on your baking sheet.
For large batches of chocolate curls, a premium stand mixer can help maintain the perfect chocolate temperature while you work.
Step 6: Troubleshoot if Needed
Is the chocolate getting too soft as you work?
Pop it back in the freezer for a minute or two.
Too brittle? Let it warm slightly at room temperature.
The perfect curl is all about that sweet spot of temperature and texture.
Step 7: Handle with Care
Use tweezers or a toothpick to carefully transfer your delicate curls to a paper towel-lined plate.
These beauties are fragile, so treat them like the chocolate royalty they are.
Step 8: Store Properly
Keep your finished curls in the refrigerator until you’re ready to use them.
They’ll maintain their shape better in cooler temperatures, but let them warm up just slightly before serving so their flavor really shines.
What to Serve with Chocolate Curls
These elegant chocolate curls deserve to be showcased properly, don’t they? Sprinkle them atop a velvety cheesecake or use them to crown a bowl of homemade vanilla ice cream for instant sophistication.
They’re absolutely divine when scattered over whipped cream-topped hot chocolate (talk about chocolate-on-chocolate action). For brunch, try them as garnish on cappuccinos or mochas—the warmth from the coffee creates this magical melting moment.
If you’re hosting, arrange them on chocolate mousse cups for a dessert that looks straight out of a pastry shop.
And honestly, sometimes I just like to place a few on a scoop of peanut butter for that whole sweet-and-salty thing that never gets old.
Chocolate Curls Substitutions and Variations
• Texture Variations: For thinner curls, use less chocolate on the sheet.
Want chocolate shavings instead? Let the chocolate harden completely and use a vegetable peeler.
Leftovers and Storage for these Chocolate Curls
These delicate chocolate decorations need proper storage to maintain their beautiful shape and texture:
- Store chocolate curls in an airtight container in the refrigerator for up to 2 weeks. Place parchment paper between layers to prevent sticking.
- For longer storage, freeze curls in an airtight container for up to 3 months. No need to thaw before using—just place them directly on your dessert.
- Keep curls away from moisture and strong odors in the refrigerator, as chocolate absorbs surrounding scents easily.
- To refresh slightly softened curls, place them on a baking sheet in the refrigerator for 5-10 minutes before serving.
- Remember, these decorative treats are best made fresh when possible, but proper storage means you can prepare them ahead for special occasions without sacrificing quality.
Final Thoughts
There’s something magical about those delicate chocolate curls that transform an ordinary dessert into something truly special.
The simple combination of quality chocolate and a careful technique creates decorations that look professionally crafted but come from your own kitchen.
These curls are perfect for holiday gatherings, birthday celebrations, or anytime you want to elevate a homemade dessert without hours of complicated work.
Whether adorning a velvety cheesecake, crowning a chocolate mousse, or scattered across a birthday cake, these chocolate curls add that touch of sophistication that makes guests wonder if you secretly trained as a pastry chef.