I’m so excited to share my No-Bake Chocolate Dream Pie with you today! When summer heat makes turning on the oven feel like torture, this silky chocolate masterpiece comes to the rescue.
Rich, indulgent, and surprisingly simple to whip up, it’s my go-to for impressing guests without breaking a sweat. The contrast between the crunchy chocolate crust and velvety smooth filling is pure magic.
Want to know the secret to getting that perfect chocolate flavor without a hint of graininess?

Why You’ll Love this No-Bake Chocolate Dream Pie
When chocolate cravings hit on a hot summer day, you’ll appreciate not having to turn on the oven for this luscious treat.
I’m telling you, this chocolate dream pie is pure decadence without the hassle. The silky-smooth chocolate filling practically melts in your mouth, while the crunchy wafer crust provides the perfect textural contrast.
And can we talk about how ridiculously easy it is? Just melt, whisk, chill.
Perfect for those moments when you need an impressive dessert but don’t have hours to spend in the kitchen. Who needs complicated baking when something this divine comes together so quickly?
What Ingredients are in No-Bake Chocolate Dream Pie?
To make our No-Bake Chocolate Dream Pie, you’ll need just a handful of quality ingredients that transform into something truly magical when combined.
- 1 9-inch chocolate wafer crust (made with Oreo cookies or similar)
- 3 4-ounce semi-sweet chocolate bars, chopped
- 2 cups heavy whipping cream, divided
- 2 tablespoons unsalted butter, cubed
- ½ teaspoon instant espresso powder (optional, but adds depth)
- 1 teaspoon vanilla extract
- ½ cup powdered sugar (for the whipped topping)
- Extra whipped cream for decoration (optional)
- Chocolate shavings for garnish (optional)
When shopping for ingredients, I always recommend using the best quality chocolate you can find—it really does make a difference in a dessert where chocolate is the star of the show, and those few extra dollars spent on good chocolate will reward you with an absolutely divine flavor profile.
How to Make this No-Bake Chocolate Dream Pie
Step 1: Prepare the Chocolate Mixture
Heat 1 cup of heavy whipping cream in a small saucepan until it just begins to simmer around the edges—but don’t let it boil.
Pour this hot cream over your 3 4-ounce chopped chocolate bars in a medium bowl and let it sit untouched for about 3 minutes, allowing the heat to work its magic.
Step 2: Create the Ganache Filling
After those 3 minutes of patience (the hardest part, honestly), add 2 tablespoons of cubed unsalted butter, ½ teaspoon of espresso powder if using, and 1 teaspoon of vanilla extract to the chocolate mixture.
Whisk everything together until perfectly smooth and glossy—this gorgeous mixture is basically a luxurious ganache that forms the heart of our pie.
Step 3: Fill the Crust
Pour your velvety chocolate mixture into the prepared 9-inch chocolate wafer crust, gently smoothing the top with a spatula.
The way it settles into that dark chocolate crust is simply mesmerizing, like watching chocolate sink into velvet.
Step 4: Initial Chilling
Place the filled pie in the refrigerator and let it chill for at least 3 hours, or until the chocolate layer is completely set.
This isn’t a step to rush—the waiting builds anticipation, and proper setting guarantees perfect slices later.
Step 5: Prepare the Whipped Topping
When your chocolate layer is set, beat the remaining 1 cup of heavy cream with ½ cup of powdered sugar and a splash of vanilla until stiff peaks form.
You’ll know it’s ready when the cream holds its shape when you lift the beaters.
Having the right baking tools from our premium baking essentials collection makes achieving perfect whipped cream much easier.
Step 6: Top the Pie
Gently spread your freshly whipped cream over the set chocolate layer, creating beautiful swirls and peaks with the back of a spoon or spatula.
This cloud-like topping provides the perfect creamy contrast to the rich chocolate below.
Step 7: Final Garnishing
For that picture-perfect finish, sprinkle chocolate shavings over the top of your whipped cream layer.
A light dusting gives the pie that professional bakery look that will have everyone reaching for their phones to snap a pic before diving in.
Step 8: Final Chill and Serve
Return the fully assembled pie to the refrigerator for at least 30 minutes before serving, allowing all the layers to harmonize.
When you’re ready to serve, use a sharp knife dipped in hot water (and wiped dry) between cuts for the cleanest slices possible.
What to Serve with No-Bake Chocolate Dream Pie
This decadent chocolate pie is practically a showstopper on its own, but a few thoughtful pairings can take your dessert experience to the next level.
A scoop of vanilla bean ice cream creates a lovely temperature contrast against the chilled pie. For drinks, nothing cuts through chocolate richness quite like a bold coffee or espresso—that bitter-sweet balance is simply magical.
Fresh berries, particularly raspberries or strawberries, offer a bright, tart counterpoint that makes the chocolate taste even more luxurious. If you’re feeling fancy, a small glass of port wine makes an elegant companion for dinner parties.
And for the simplest option? A cold glass of milk is the timeless, nostalgic choice that never disappoints.
No-Bake Chocolate Dream Pie Substitutions and Variations
- Flavor Twists: Add 2 tablespoons of orange zest, a splash of bourbon, or 1/4 teaspoon of cinnamon to the chocolate mixture.
- Pretty Garnishes: Try chocolate curls, crushed toffee bits, edible gold flakes, or a light dusting of cocoa powder on top of the whipped cream.
Leftovers and Storage for this No-Bake Chocolate Dream Pie
This decadent chocolate pie stores beautifully in the refrigerator for up to 5 days when covered tightly with plastic wrap.
The flavors actually deepen overnight, making it taste even richer the next day—perfect for planning ahead!
For longer storage, this pie freezes wonderfully:
- Freeze the whole pie or individual slices on a baking sheet until firm
- Wrap tightly in plastic wrap, then aluminum foil
- Store frozen for up to 1 month
When ready to enjoy frozen pie, thaw in the refrigerator for 3-4 hours (not at room temperature, which can make the filling weep).
For best texture, never microwave this pie—the chocolate filling loses its silky consistency when heated.
A cold slice straight from the fridge is pure chocolate perfection.
Final Thoughts
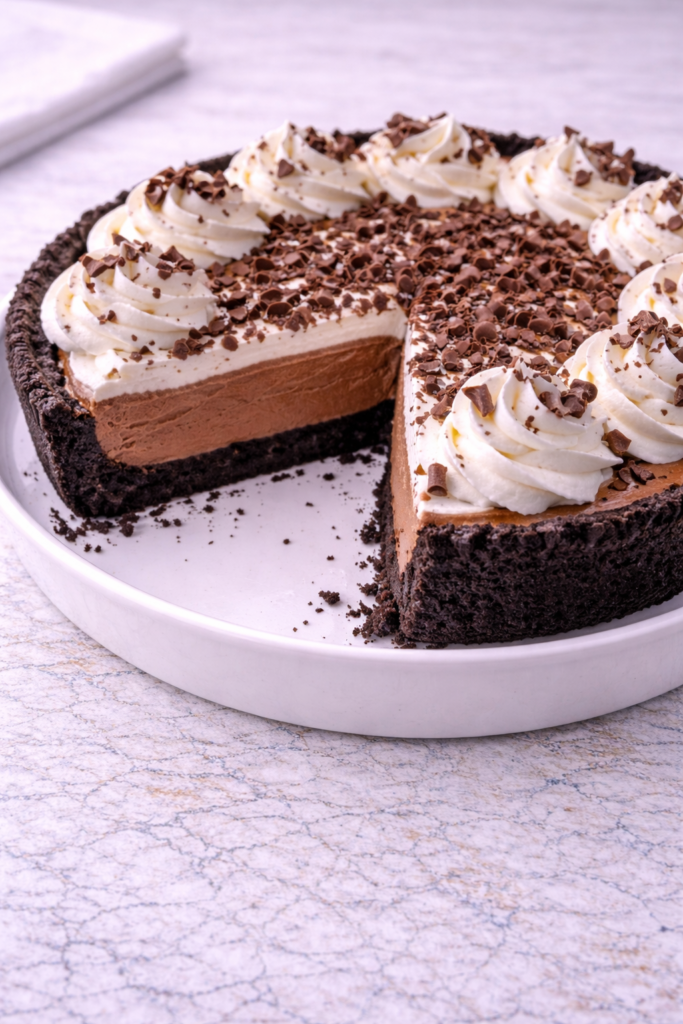
This No-Bake Chocolate Dream Pie is truly something special—silky chocolate filling nestled in a crunchy chocolate wafer crust creates a perfect textural contrast in every bite.
What makes it particularly wonderful is how the simplicity of preparation belies its impressive, restaurant-worthy presentation.
It’s my go-to dessert for summer gatherings when turning on the oven feels like a punishment, or during busy holiday seasons when oven space is at a premium.
The make-ahead nature means you can prepare it days before guests arrive, allowing the flavors to develop while freeing you to focus on other details. Some desserts come and go, but a chocolate cream pie like this one remains timeless comfort on a plate.