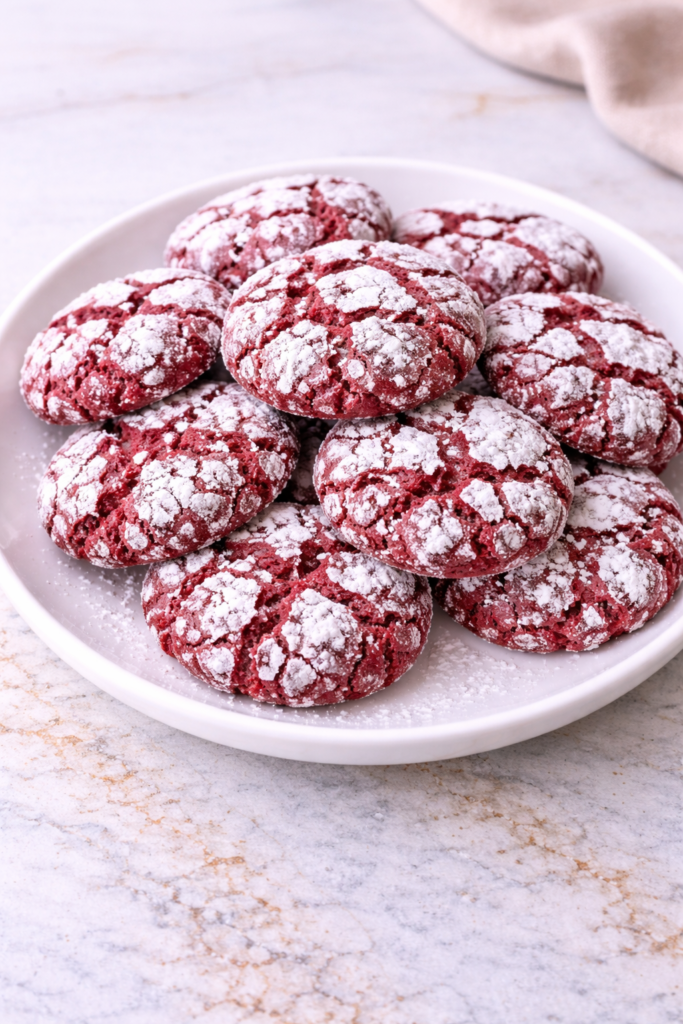
I’ve been dreaming about these Red Velvet Crinkle Cookies for days. There’s something magical about watching them transform in the oven—cracking on top to reveal that striking contrast between the powdery white exterior and the vibrant red inside.
They’re not just gorgeous to look at, though. Each bite delivers a soft, fudgy center that practically melts in your mouth.
Want to know my secret for getting that perfect crinkle effect every single time? The trick lies in a technique that most recipes completely overlook…

Why You’ll Love these Red Velvet Crinkle Cookies
When you’re craving something that’s both visually stunning and utterly delicious, these red velvet crinkle cookies are exactly what you need.
The striking contrast between the deep crimson interior and snowy powdered sugar coating makes them perfect for holiday gatherings or special occasions.
I can’t get enough of their fudgy centers—slightly gooey with that perfect cocoa-vanilla balance.
And those crackly tops? Pure magic. They develop naturally as the cookies bake, creating a beautiful texture contrast.
Plus, they’re surprisingly simple to make. Just roll, coat, bake. No fancy techniques required.
What Ingredients are in Red Velvet Crinkle Cookies?
These gorgeous, crackle-topped cookies require just a handful of pantry staples plus that signature red food coloring for their showstopping appearance.
- 1/2 cup unsalted butter, softened
- 3/4 cup light brown sugar, packed
- 1/2 cup granulated sugar
- 2 large eggs, at room temperature
- 2 teaspoons vanilla extract
- 1/2 teaspoon red food coloring
- 2 cups all-purpose flour
- 1/3 cup cocoa powder
- 1 1/2 teaspoons baking powder
- 1/2 teaspoon salt
- 1/2 cup granulated sugar (for coating)
- 1/2 cup powdered sugar (for coating)
For best results, make sure your butter and eggs are properly at room temperature—this helps create that perfect fudgy texture we’re aiming for, and the coating sugars are what give these cookies their distinctive crinkle appearance.
How to Make these Red Velvet Crinkle Cookies
Step 1: Preheat Your Oven and Prepare Equipment
Preheat your oven to 350°F and line your baking sheets with parchment paper.
This simple prep work guarantees your cookies will bake evenly and won’t stick to the pan.
Having premium baking essentials on hand like quality baking sheets will ensure consistent results every time.
Step 2: Cream Together the Butter and Sugars
In a large bowl, cream together 1/2 cup softened unsalted butter, 3/4 cup packed light brown sugar, and 1/2 cup granulated sugar until light and fluffy.
This vital step incorporates air into the mixture, giving your cookies that perfect texture.
Step 3: Add Wet Ingredients
Add 2 large room temperature eggs one at a time, mixing well after each addition.
Then mix in 2 teaspoons of vanilla extract and 1/2 teaspoon of red food coloring until the mixture is vibrant and uniform.
Step 4: Combine Dry Ingredients
In a separate bowl, sift together 2 cups all-purpose flour, 1/3 cup cocoa powder, 1 1/2 teaspoons baking powder, and 1/2 teaspoon salt.
Sifting removes any lumps and helps create that tender crinkle texture we’re after.
Step 5: Mix Wet and Dry Ingredients
Gradually add the dry ingredients to the wet mixture, stirring just until combined.
Over-mixing can lead to tough cookies, and nobody wants that, right?
Step 6: Shape and Coat the Cookies
Scoop dough into balls and first roll in 1/2 cup granulated sugar, then in 1/2 cup powdered sugar.
The double-coating is what creates those gorgeous crackles as the cookies bake and expand.
Step 7: Arrange and Bake
Place the coated dough balls about 1 inch apart on your prepared baking sheets.
Bake for 10 minutes until the cookies have spread and cracked on top but still remain slightly gooey inside.
Step 8: Cool and Enjoy
Let the cookies cool on the baking sheet for a few minutes before transferring to a wire rack.
These red velvet beauties are at their best when they’re just barely cool enough to handle—still warm with a fudgy center that makes you close your eyes with each bite.
What to Serve with Red Velvet Crinkle Cookies
These irresistible red beauties deserve some equally delightful companions. A tall glass of cold milk is the classic choice, creating that perfect dunk-worthy moment we all secretly live for.
For something more grown-up, try a creamy coffee with a splash of Irish cream liqueur that complements the cocoa notes. Fresh berries on the side—particularly strawberries or raspberries—add a bright, tart contrast to the cookies’ sweetness.
Want something truly decadent? Serve these cookies slightly warm with a scoop of vanilla bean ice cream nestled between two to make the world’s most impressive sandwich.
These cookies make a showstopping addition to afternoon tea time or as the finale to a casual dinner party. And honestly, who’s going to complain if they show up at breakfast?
Red Velvet Crinkle Cookies Substitutions and Variations
Need to switch things up? These crinkle cookies are wonderfully adaptable:
- Butter alternatives: Use coconut oil or dairy-free butter for a lactose-free version.
- Gluten-free option: Substitute all-purpose flour with a 1:1 gluten-free baking blend.
- Natural coloring: Replace artificial red food coloring with 2 tablespoons of beet powder.
- Vegan version: Swap eggs for flax eggs (2 Tbsp ground flaxseed mixed with 6 Tbsp water).
- Flavor boosters: Add 1/2 cup white chocolate chips, crushed peppermint candies, or chopped nuts.
- Reduce sugar: Cut granulated sugar to 1/3 cup and use coconut sugar instead of brown sugar.
- Holiday twist: Add 1/4 teaspoon peppermint extract for a festive Christmas cookie.
- Fancy finish: Drizzle cooled cookies with melted white chocolate or cream cheese icing for extra decadence.
Leftovers and Storage for these Red Velvet Crinkle Cookies
These gorgeous crinkle cookies stay deliciously fresh in an airtight container at room temperature for up to 5 days—though honestly, they rarely last that long in my house!
For longer storage:
- Refrigerate in a sealed container with parchment between layers for up to 10 days
- Freeze baked cookies for up to 3 months in a freezer-safe bag
- Freeze raw dough balls (before sugar coating) for up to 2 months
To refresh day-old cookies, pop them in the microwave for 8-10 seconds—just enough to slightly warm the centers back to that irresistible gooey texture.
For frozen cookies, thaw at room temperature for about 30 minutes before enjoying.
While these cookies are amazing fresh from the oven, many bakers swear they taste even better the next day when the flavors have had time to meld!
Final Thoughts
These Red Velvet Crinkle Cookies bring together the best of both worlds—the beloved flavor of red velvet cake in a convenient, hand-held cookie form.
The contrast between the powdery white exterior and that rich, vibrant red interior creates not just a stunning visual, but a perfect texture balance of slightly crisp edges with soft, almost brownie-like centers.
They’re absolutely perfect for holiday cookie exchanges, Valentine’s Day celebrations, or anytime you need a bit of color on your dessert tray.
Something about that classic combination of subtle cocoa and vanilla, wrapped in that signature crinkle texture, makes these cookies a recipe I return to again and again when I want to make something truly memorable.