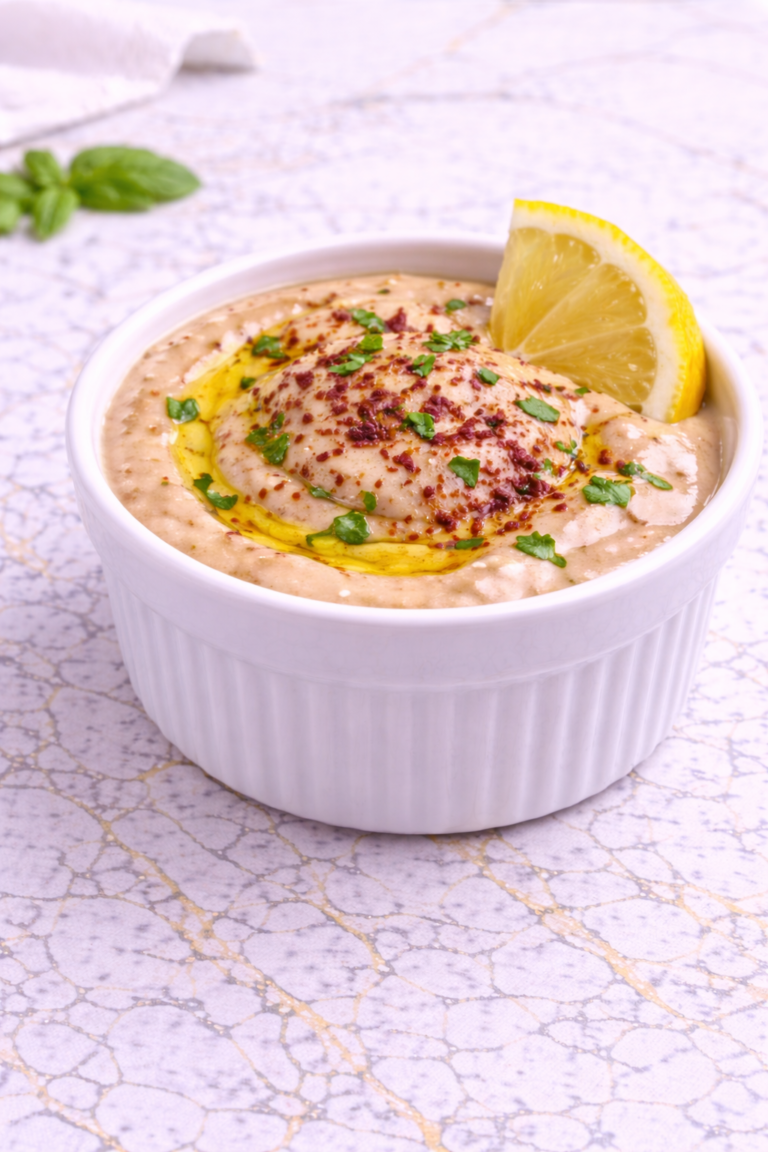
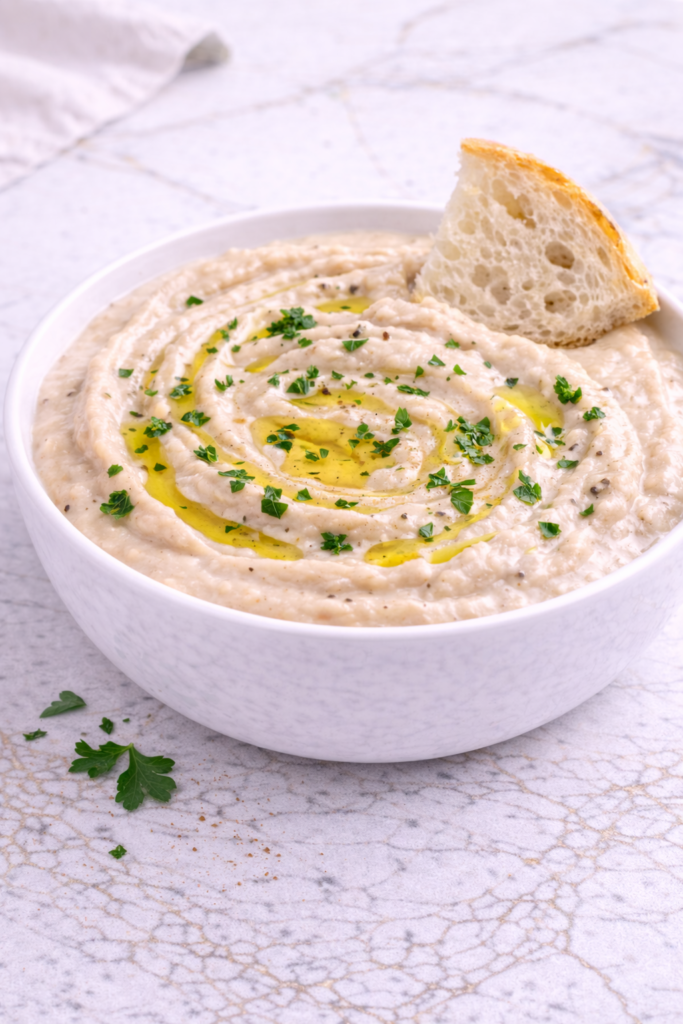
I make White Bean Garlic Dip when I need something quick, fresh, and dependable for snacks or simple meals. It blends into a smooth, creamy dip with very little effort, and the garlic gives it bold flavor without needing many ingredients. It always feels like a smart recipe to keep on hand.
My family loves this dip with vegetables, crackers, pita, or spread onto sandwiches and wraps. It is filling, budget-friendly, and easy to make ahead for busy days. When I want a homemade option that feels both simple and satisfying, this is one I come back to often.
Why You’ll Love This Recipe
White Bean Garlic Dip is creamy, savory, and full of fresh flavor. The beans blend into a smooth base, while garlic, lemon, and olive oil create a rich taste that feels bright and balanced. It is comforting without being heavy.
This recipe is also very practical for home cooks. It uses pantry ingredients, comes together in minutes, and requires no cooking if you use canned beans. That makes it perfect for quick snacks, lunches, or last-minute guests.
Another reason to love it is how flexible it can be. Serve it as a dip, spread, sandwich layer, or side dish. You can make it mild or bold depending on how much garlic and seasoning you add.
Serves: 6 people
This recipe serves about 6 people as an appetizer or snack dip. If using it as a spread for wraps or sandwiches, it can stretch even further. It is easy to double for parties or meal prep.
Ingredients You’ll Need
Main Ingredients
- 2 (15-ounce) cans white beans, drained and rinsed
- 2 to 3 cloves garlic
- 3 tablespoons lemon juice
- 1/4 cup olive oil
- 1/2 teaspoon salt
- 1/4 teaspoon black pepper
- 1/2 teaspoon ground cumin (optional)
- 2 to 4 tablespoons water, as needed
Optional Toppings
- Chopped parsley
- Red pepper flakes
- Extra drizzle of olive oil
- Lemon zest
- Toasted sesame seeds
Optional for Serving
- Pita wedges
- Crackers
- Carrot sticks
- Cucumber slices
- Bell pepper strips
Cannellini, great northern, or navy beans all work well here. Fresh lemon juice gives the brightest flavor, and good olive oil adds richness. Start with fewer garlic cloves if you prefer a milder dip.
Pro Tips
Rinse canned beans well
Rinsing removes excess salt and canned flavor. It also helps create a cleaner taste in the finished dip.
Blend longer than you think
Extra blending makes the dip smoother and creamier. Scrape down the sides of the processor as needed.
Add water slowly
A tablespoon at a time helps control the texture. This keeps the dip thick enough for scooping but still smooth.
Taste before serving
Beans can vary in flavor, so adjust salt, lemon, or garlic after blending. Small changes make a big difference.
Use roasted garlic for a milder version
Roasted garlic adds sweetness and softer flavor. It is a great option for kids or garlic-sensitive eaters.
Chill for best flavor
A short rest in the refrigerator helps the flavors blend together. Even 30 minutes can improve the taste.
Tools You’ll Need
- Food processor or blender
- Measuring cups
- Measuring spoons
- Can opener
- Fine mesh strainer or colander
- Spatula
- Serving bowl
- Knife and cutting board
Having ingredients ready before blending makes this recipe especially quick. It is one of those dishes that feels easy from start to finish.
Substitutions and Variations
Use Chickpeas Instead
Swap the white beans for chickpeas. The dip will be slightly nuttier and a little firmer, similar to hummus.
Make It Dairy-Free
This recipe is naturally dairy-free as written. Just check toppings and served sides if needed.
Add Fresh Herbs
Blend in parsley, basil, dill, or cilantro. Herbs add color and a fresh twist to the flavor.
Boost the Spice
Add cayenne, red pepper flakes, or a spoonful of chili paste. This creates a bolder dip without changing the creamy base.
Make It Extra Creamy
Blend in a spoonful of Greek yogurt or tahini. This gives a richer texture while keeping the recipe recognizable.
Make Ahead Tips
White Bean Garlic Dip is one of the easiest recipes to prepare ahead of time. You can make the dip up to three days in advance and store it in an airtight container in the refrigerator. In many cases, the flavor becomes even better after the garlic, lemon, and olive oil have time to blend together.
If you know you will be serving guests, chop vegetables and prepare crackers or pita ahead of time as well. Store everything separately until serving time so the fresh items stay crisp. This makes snack trays or appetizers much easier to assemble later.
You can also portion the dip into small containers for lunches and quick snacks. Having it ready in the refrigerator makes healthy choices feel more convenient.
Instructions
Step 1: Drain and Rinse the Beans
Open the cans of white beans and pour them into a colander or strainer. Rinse well under cool water, then let them drain fully. This removes extra liquid and improves the flavor.
Step 2: Prepare the Garlic
Peel the garlic cloves and trim the ends. If you prefer a milder dip, start with 2 cloves instead of 3. You can always add more after blending.
Step 3: Add Ingredients to the Processor
Place the drained beans, garlic, lemon juice, olive oil, salt, black pepper, and cumin if using into a food processor or blender. Make sure the lid is secured before blending.
Step 4: Blend Until Smooth
Process the mixture for 1 to 2 minutes, stopping to scrape down the sides as needed. The dip should begin to look creamy and well combined.
Step 5: Adjust the Texture
Add water 1 tablespoon at a time while blending until the dip reaches your preferred consistency. Use less water for a thick spread or more for a softer dip. Blend again until smooth.
Step 6: Taste and Adjust Seasoning
Taste the dip with a clean spoon. Add more lemon juice for brightness, more salt for flavor, or another clove of garlic for a stronger bite if desired. Blend briefly again after adjusting.
Step 7: Chill or Serve
Transfer the dip to a serving bowl. Serve right away or chill for 30 minutes for even better flavor. A short chill time helps the ingredients settle together nicely.
Step 8: Add Toppings
Before serving, drizzle with olive oil and sprinkle with parsley, red pepper flakes, lemon zest, or sesame seeds if desired. These simple toppings add color and texture.
Serving Suggestions
Serve White Bean Garlic Dip with pita wedges, crackers, or toasted bread slices. It makes an easy appetizer or afternoon snack.
Add carrot sticks, cucumber slices, celery, or bell pepper strips for a fresh vegetable platter. This is one of my favorite ways to serve it.
Spread the dip inside wraps or sandwiches instead of mayonnaise. It adds creaminess and flavor while keeping meals simple.
Use it as a side for grilled chicken, roasted vegetables, or grain bowls. It works well like a savory sauce.
Spoon it onto toast and top with sliced tomatoes or avocado. This makes a quick lunch or light breakfast.
Serve it on a snack board with olives, cheese, nuts, and fresh vegetables. It fits naturally into casual gatherings.
Leftovers and Storage
Store leftover White Bean Garlic Dip in an airtight container in the refrigerator for up to five days. Press a small piece of plastic wrap directly on the surface if you want to reduce drying. Stir before serving again.
The dip may thicken after chilling, which is normal. Add a small splash of water or olive oil and stir until smooth again. This helps restore the creamy texture.
For best flavor, let chilled dip sit at room temperature for 10 to 15 minutes before serving. Cold temperatures can mute the garlic and lemon slightly.
You can also freeze the dip for up to two months in a freezer-safe container. Thaw overnight in the refrigerator and stir well before using.
Nutrition and Benefits
- White beans provide plant-based protein and fiber, which help make snacks more filling.
- Olive oil adds heart-friendly fats and a rich smooth texture.
- Garlic and lemon bring strong flavor without needing heavy ingredients.
- Homemade dips let you control salt levels and ingredient quality.
- Pairing this dip with vegetables can make snack time more balanced and satisfying.
Recipe FAQ
What kind of white beans work best?
Cannellini beans are especially creamy and mild. Great northern beans and navy beans also work very well. Use whichever is easiest to find.
Can I use dried beans instead of canned?
Yes, cook dried beans until very soft first. Let them cool slightly, then measure about 3 cups cooked beans to replace the canned beans. Soft beans blend best.
Is this dip similar to hummus?
It is similar in texture but uses white beans instead of chickpeas. The flavor is milder and creamier. Many people enjoy it as a softer alternative.
How do I make it less garlicky?
Start with fewer cloves and add more only if needed. Roasted garlic is another good option because it tastes sweeter and gentler.
Why is my dip too thick?
Beans vary in moisture, so some batches need more liquid. Blend in water or olive oil a little at a time until smooth. Lemon juice can also help loosen it.
Can I make this without a food processor?
Yes, a blender works well. You can also mash everything by hand with a fork or potato masher, though the texture will be chunkier.
What can I serve with this dip?
Pita, crackers, toast, vegetables, wraps, and grain bowls are all great options. It is very versatile. Use it anywhere you would enjoy a savory spread.
Conclusion
White Bean Garlic Dip is a simple recipe that brings fresh flavor and dependable ease to everyday meals.
It turns pantry ingredients into something creamy, satisfying, and useful in many different ways.
Whether served as a snack, spread, or appetizer, it fits naturally into busy family life.
Its quick prep, wholesome ingredients, and reliable taste make it worth making again and again.