
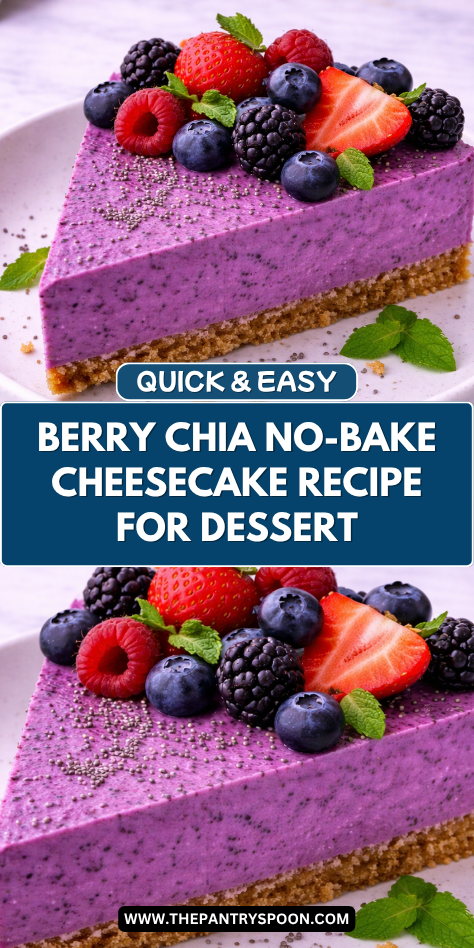
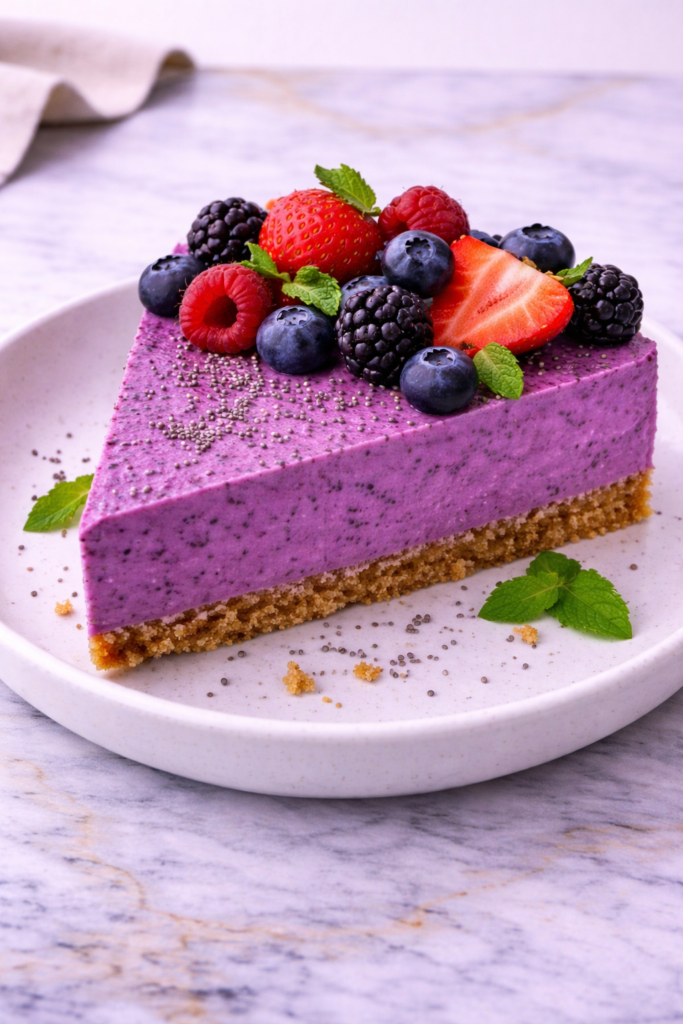
I make berry chia no-bake cheesecake when I want something creamy and indulgent without turning on the oven or spending hours in the kitchen. The chia seeds help thicken the filling naturally while adding little pops of texture, and fresh berries on top keep it from being too heavy.
I’ll show you how to press the crust firmly so it holds together when you slice it, and how to blend the filling until it’s smooth and creamy.
You just chill it in the fridge for a few hours, and it’s ready to go. It tastes rich and satisfying but feels lighter than traditional baked cheesecake.
Why You’ll Love This Recipe
This berry chia no-bake cheesecake is loved for its creamy texture, subtle sweetness, and vibrant berry topping. The chia seeds add a delicate crunch and boost fiber and omega-3s, while the crust provides a satisfying, nutty base. Each bite is balanced and refreshing, making it a dessert you can enjoy any time of the year.
It’s also versatile and forgiving. You can use any combination of fresh or frozen berries, adjust the sweetness to taste, and even make mini cheesecake jars for individual servings. This flexibility makes it great for gatherings, meal prep, or solo indulgence.
Another reason to love this recipe is its approachability. With no baking required, it’s perfect for beginners or anyone who wants a simple yet impressive dessert. It also keeps well in the refrigerator, so you can make it ahead and enjoy over a few days.
Serves: 6–8 people
This recipe makes 6–8 servings, depending on portion size. It works well as a dessert after dinner, a snack, or even a light breakfast treat for chia and berry lovers.
Ingredients You’ll Need
For the Crust:
- 1 1/2 cups graham cracker crumbs or digestive biscuits
- 1/4 cup almond flour (optional, for extra nuttiness)
- 1/3 cup melted butter or coconut oil
- 2 tablespoons maple syrup or honey
For the Cheesecake Filling:
- 8 ounces cream cheese or plant-based cream cheese, softened
- 1/2 cup Greek yogurt or plant-based yogurt
- 1/4 cup maple syrup or honey
- 1 teaspoon vanilla extract
- 3 tablespoons chia seeds
For the Berry Topping:
- 1 1/2 cups fresh or frozen berries (strawberries, blueberries, raspberries, or mixed)
- 1–2 tablespoons maple syrup or honey
- 1 teaspoon lemon juice
- Optional: fresh mint for garnish
Pro Tips
Use room temperature cream cheese and yogurt to ensure a smooth filling. This prevents lumps and gives a silky texture.
Press the crust firmly into the pan or jars. This ensures it holds together when serving.
Allow the chia seeds to soak in the filling for at least 30 minutes before serving. Overnight refrigeration gives the best texture and a firmer cheesecake consistency.
Adjust the sweetness of the filling and berry topping to your taste. Depending on the tartness of your berries, you may need a little more or less sweetener.
Use a springform pan for easy removal, or individual serving jars for portion-controlled servings.
For an extra layer of flavor, gently mash a few berries into the filling before adding the remaining whole berries on top.
Tools You’ll Need
- Mixing bowls
- Whisk or electric mixer
- Measuring cups and spoons
- Spatula
- Springform pan or individual jars
- Spoon for layering berries
Substitutions and Variations
For a gluten-free crust, use gluten-free graham crackers or cookies.
Swap the sweetener with agave, coconut sugar, or a sugar-free alternative for a lower-sugar version.
Use coconut yogurt or almond milk cream cheese for a vegan-friendly dessert.
Add lemon zest to the cheesecake filling for a bright, citrusy flavor.
Mix in other fruits like mango, kiwi, or pomegranate seeds for a colorful twist.
For added crunch, sprinkle chopped nuts or granola over the berry topping before serving.
This berry chia no-bake cheesecake is a versatile, creamy, and vibrant dessert that’s simple to prepare and perfect for any occasion. It’s a plant-forward dessert that balances indulgence with fresh, wholesome ingredients.
Make Ahead Tips
This berry chia no-bake cheesecake is perfect for preparing ahead of time, which makes it ideal for gatherings, weeknight desserts, or meal prep for sweet treats. You can prepare the crust, filling, and topping separately and assemble them just before serving, or assemble the entire cheesecake and refrigerate.
If making ahead, store the cheesecake in an airtight container or cover the springform pan with plastic wrap. Refrigerate for 4–6 hours or overnight to allow the chia seeds to fully set the filling. This ensures a firm, sliceable texture that holds its shape.
The berry topping can also be prepared in advance. Mix berries with maple syrup or honey and lemon juice, then store in the refrigerator for up to 24 hours. Add the topping just before serving to maintain the vibrant color and freshness of the berries.
Mini cheesecakes in jars can also be made ahead. Assemble individual portions in airtight containers and refrigerate until ready to serve. This makes them convenient for portion control, gifts, or grab-and-go desserts.
Instructions
Step 1: Prepare the Crust
In a medium bowl, combine graham cracker crumbs, almond flour (if using), melted butter, and maple syrup. Mix until the crumbs are evenly coated and hold together when pressed. Press the mixture firmly into the bottom of a springform pan or individual jars to form an even layer. Refrigerate while preparing the filling to set slightly.
Step 2: Prepare the Cheesecake Filling
In a large mixing bowl, beat the softened cream cheese until smooth. Add Greek yogurt, maple syrup, and vanilla extract, and mix until fully combined. Stir in chia seeds, making sure they are evenly distributed. The chia seeds will thicken the filling and add a subtle texture.
Step 3: Assemble the Cheesecake
Spread the cheesecake filling evenly over the prepared crust. Smooth the top with a spatula for an even layer. For a firmer texture, cover and refrigerate for at least 30 minutes to allow the chia seeds to swell and set the filling. Overnight chilling will produce a denser, sliceable cheesecake.
Step 4: Prepare the Berry Topping
In a small bowl, combine the berries with maple syrup or honey and a splash of lemon juice. Gently toss to coat. Taste and adjust sweetness if needed. For a thicker topping, mash a few berries to release juice while keeping some whole for texture.
Step 5: Add the Berry Topping
Spoon the berry mixture evenly over the chilled cheesecake. Spread gently to avoid mixing the berries into the filling. For extra visual appeal, arrange berries in patterns or alternate colors.
Step 6: Garnish and Serve
Add optional garnishes like fresh mint, edible flowers, or a sprinkle of toasted nuts. This enhances both flavor and presentation. Slice carefully with a sharp knife for clean edges, wiping the knife between cuts if needed.
Step 7: Serve Immediately or Chill
Serve the cheesecake immediately for soft, creamy texture or return it to the refrigerator to chill further. Chilling intensifies the flavors and makes the slices firmer and easier to handle.
Serving Suggestions
This no-bake cheesecake pairs beautifully with a cup of tea or coffee for a refreshing dessert experience. The natural tartness of the berries balances the creamy, mildly sweet filling.
Serve it as part of a dessert spread alongside fruit tarts, chocolate bites, or mini muffins for variety. The visual appeal and vibrant colors make it an attractive centerpiece.
For a lighter serving, slice small portions and serve in individual jars or glasses. Layer additional berries or granola for added texture and presentation.
The cheesecake can also be paired with a drizzle of berry coulis or a dollop of whipped cream for an elegant touch, perfect for holiday meals or special occasions.
Leftovers and Storage
Store any leftover cheesecake in an airtight container in the refrigerator for up to 3 days. Keep the berry topping separate if possible to prevent it from soaking into the crust.
Refrigerate assembled cheesecake carefully to maintain the integrity of the layers. Slices can be wrapped individually for convenient snacking later.
For longer storage, freeze the cheesecake without the fresh berries. Wrap tightly in plastic wrap and foil, and freeze for up to 1 month. Thaw in the refrigerator overnight before adding fresh berry topping.
Nutrition and Benefits
- Chia seeds provide fiber, protein, and omega-3 fatty acids, making this dessert nutritious as well as delicious.
- Fresh berries contribute antioxidants, vitamin C, and natural sweetness while enhancing color and flavor.
- Using moderate sweeteners like maple syrup or honey balances the dessert without excessive sugar.
- Greek yogurt adds creaminess and protein, while reducing the richness compared to a traditional cheesecake.
- Overall, this dessert offers a plant-forward, nutrient-dense alternative to conventional desserts, combining indulgence and healthful ingredients.
Recipe FAQ
Can I use frozen berries?
Yes, thaw them slightly before using. Gently drain any excess liquid to prevent a soggy topping.
Is this recipe vegan?
Yes, by using plant-based cream cheese and yogurt along with a vegan sweetener, the recipe becomes fully vegan.
How long should I chill the cheesecake?
At least 30 minutes for the chia seeds to set, but 4–6 hours or overnight is ideal for firmer slices.
Can I make individual servings?
Absolutely! Use small jars or cups for mini cheesecakes. Assemble in layers and refrigerate until ready to serve.
Can I add other toppings?
Yes, toasted coconut, granola, or nuts add crunch, while a drizzle of chocolate or berry coulis enhances flavor.
How do I prevent the crust from getting soggy?
Ensure the crust is pressed firmly and consider adding a thin layer of melted chocolate or nut butter before adding the filling to create a moisture barrier.
Can I double the recipe?
Yes, simply double the ingredients and use a larger pan or multiple smaller pans. Adjust chilling time accordingly.
A Fresh, Creamy, and Delightful Dessert
This berry chia no-bake cheesecake is a perfect balance of creamy filling, crunchy crust, and vibrant fruit topping. Each bite is refreshing, lightly sweetened, and filled with flavor and nutrition.
Whether you’re serving it for a casual dessert, a festive occasion, or a make-ahead treat, it’s a recipe that fits naturally into real life. With simple steps, beautiful presentation, and delicious flavor, it’s one you’ll want to make again and again.


