
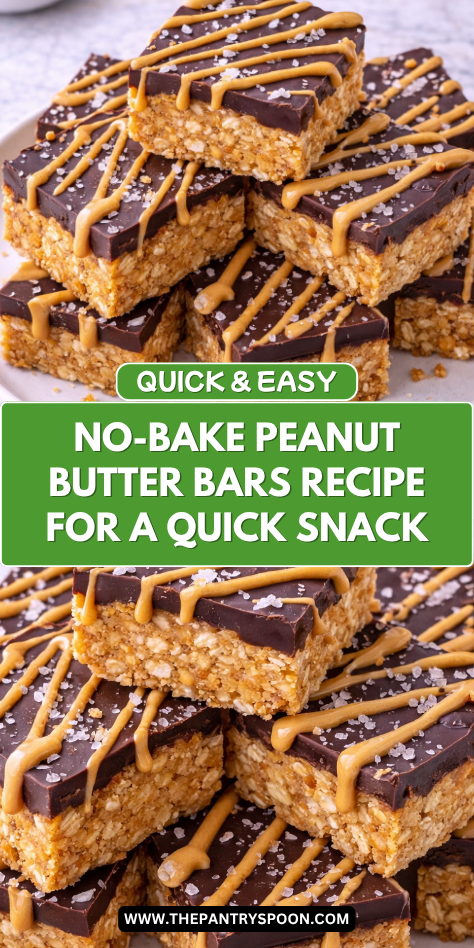
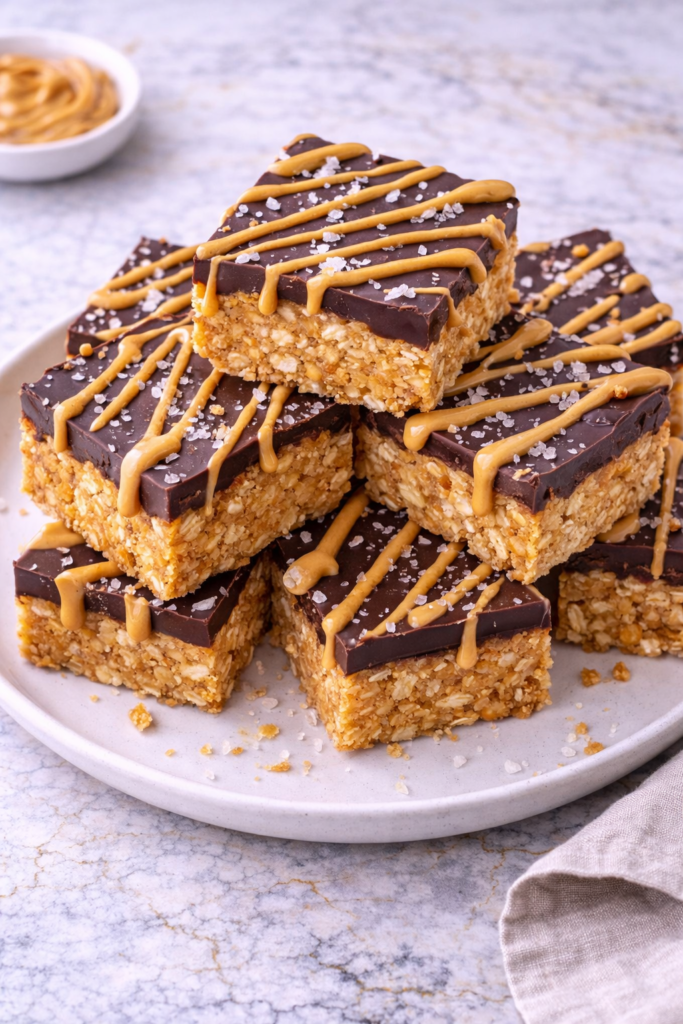
I started making these when I needed something sweet and satisfying that came together without turning on the oven. Peanut butter and a few pantry staples press into a firm, fudgy bar that tastes rich and indulgent without requiring any real effort.
A layer of chocolate on top takes them somewhere even better and sets up with a clean snap that makes every bite feel like a proper treat. I’ll show you the right ratio so yours come out firm enough to slice cleanly and hold together well.
It’s the kind of simple, no-bake recipe that earns a permanent spot in your regular rotation fast.
Why You’ll Love This Recipe
These No-Bake Peanut Butter Bars are rich, creamy, and perfectly balanced with just the right amount of sweetness. The smooth peanut butter layer paired with a chocolate topping creates a classic flavor combination that feels both nostalgic and indulgent.
They’re incredibly easy to prepare, making them ideal for beginner cooks or anyone short on time. With no oven required, you can whip up a batch quickly and let the refrigerator do the rest of the work.
Families especially love this recipe because it’s dependable and crowd-pleasing. Whether you’re serving kids or adults, these bars disappear fast and are just as perfect for casual snacking as they are for sharing at gatherings.
Serves: 12 people
This recipe yields about 12 generous bars, depending on how you slice them. You can easily cut them into smaller squares for larger groups or bite-sized portions for parties and lunchbox treats.
Ingredients You’ll Need
For the peanut butter base:
- 1 cup creamy peanut butter
- ½ cup unsalted butter, melted
- 2 cups powdered sugar
- 1 ½ cups graham cracker crumbs
- 1 teaspoon vanilla extract
For the chocolate topping:
- 1 ½ cups semi-sweet chocolate chips
- 2 tablespoons peanut butter
Pro Tips
Use creamy peanut butter for the smoothest texture and easiest mixing. Natural peanut butter can work, but it may result in a softer base that doesn’t hold together as well.
Make sure the butter is fully melted before combining it with the other ingredients. This helps everything blend evenly and creates a cohesive, firm layer once chilled.
Press the base mixture firmly into the pan to avoid crumbly bars later. Taking a moment to smooth and compact the layer will make slicing much cleaner and easier.
When melting the chocolate, do it slowly in short intervals to prevent burning. Stirring between each interval ensures a silky, glossy topping.
Line your pan with parchment paper for easy removal. This small step makes lifting and slicing the bars much simpler and keeps the edges neat.
Allow enough chilling time before cutting to help the layers fully set. Rushing this step can result in messy slices and a softer texture than intended.
Tools You’ll Need
- Mixing bowl
- Spatula or wooden spoon
- 9×13-inch baking dish
- Parchment paper
- Microwave-safe bowl or double boiler
- Measuring cups and spoons
- Knife for slicing
Substitutions and Variations
If you prefer a different nut butter, almond butter or cashew butter can be used in place of peanut butter. Each option brings its own subtle flavor while still maintaining the creamy texture of the bars.
For a gluten-free version, swap the graham cracker crumbs with gluten-free graham crackers or crushed gluten-free cookies. This keeps the structure intact while accommodating dietary needs.
You can adjust the sweetness by slightly reducing the powdered sugar or using dark chocolate instead of semi-sweet. This creates a richer, less sweet version that some adults may prefer.
For added texture, consider mixing in chopped peanuts or a sprinkle of sea salt on top of the chocolate layer. These small additions create contrast and elevate the overall flavor.
If you want to make the bars feel a bit more indulgent, drizzle extra melted chocolate over the top or add a thin layer of caramel between the base and chocolate. These variations are simple but make the dessert feel extra special.
Make Ahead Tips
These No-Bake Peanut Butter Bars are perfect for making ahead, which is one of the reasons they’re so popular for busy households. You can prepare the entire recipe a day or two in advance and keep it covered in the refrigerator until you’re ready to slice and serve.
If you’re planning for an event, you can also freeze the bars after they’ve fully set. Once chilled, cut them into portions, place them in an airtight container with parchment between layers, and freeze for up to one month.
For best results, allow frozen bars to thaw in the refrigerator for a few hours before serving. This helps maintain their smooth texture and prevents the chocolate topping from cracking when sliced.
Instructions
Step 1: Prepare the Pan
Line a 9×13-inch baking dish with parchment paper, leaving a bit of overhang on the sides for easy removal. This will make lifting and slicing the bars much simpler later on.
Set the prepared pan aside while you make the peanut butter base. Having everything ready will help the process move smoothly and quickly.
Step 2: Mix the Peanut Butter Base
In a large mixing bowl, combine the creamy peanut butter, melted unsalted butter, powdered sugar, graham cracker crumbs, and vanilla extract. Stir until the mixture is fully combined and forms a thick, cohesive dough.
The texture should be soft but firm enough to hold its shape when pressed. If it feels too sticky, you can add a small amount of extra graham cracker crumbs to balance it.
Step 3: Press into the Pan
Transfer the peanut butter mixture into the prepared baking dish. Use a spatula or the back of a spoon to spread it evenly across the bottom.
Press the mixture down firmly to create a compact, even layer. Taking your time here ensures the bars will hold together well when sliced.
Step 4: Melt the Chocolate Topping
In a microwave-safe bowl or using a double boiler, combine the semi-sweet chocolate chips and peanut butter. Heat in short intervals, stirring frequently, until the mixture is completely smooth and glossy.
Be careful not to overheat the chocolate, as it can seize or become grainy. Slow, gentle melting will give you the best texture.
Step 5: Add the Chocolate Layer
Pour the melted chocolate mixture over the peanut butter base. Use a spatula to spread it evenly, making sure it reaches all edges of the pan.
Tap the pan gently on the counter to level the chocolate and remove any air bubbles. This step helps create a smooth, professional-looking finish.
Step 6: Chill Until Set
Place the pan in the refrigerator and allow the bars to chill for at least 2–3 hours, or until the chocolate topping is firm. The base should also feel set and hold together when pressed lightly.
If you’re short on time, you can place the pan in the freezer for about 1 hour. Just be sure not to leave it too long before slicing.
Step 7: Slice and Serve
Once fully set, lift the bars out of the pan using the parchment overhang. Place them on a cutting board and use a sharp knife to slice into squares or rectangles.
For clean cuts, wipe the knife between slices. Serve chilled or slightly softened, depending on your preferred texture.
Serving Suggestions
These bars are best served slightly chilled, where the layers hold their shape while still offering a soft, creamy bite. They make an excellent after-dinner dessert when you want something sweet but not overly complicated.
For a more polished presentation, you can cut them into smaller squares and arrange them on a serving platter. This works especially well for gatherings, where guests can easily grab a portion.
Pairing these bars with a glass of cold milk or a warm cup of coffee creates a comforting combination that appeals to both kids and adults. The rich peanut butter and chocolate flavors complement simple beverages beautifully.
You can also add a light sprinkle of flaky sea salt on top just before serving. This enhances the sweetness and adds a subtle contrast that makes each bite more interesting.
For special occasions, consider serving the bars alongside other no-bake treats. This creates a dessert spread that feels abundant without requiring extra time in the kitchen.
Leftovers and Storage
Store any leftover No-Bake Peanut Butter Bars in an airtight container in the refrigerator. They will stay fresh for up to one week while maintaining their texture and flavor.
If stacking the bars, place a layer of parchment paper between them to prevent sticking. This keeps the chocolate topping intact and makes it easier to grab individual pieces.
For longer storage, these bars freeze very well. Wrap them tightly or store them in a freezer-safe container, and they can be kept for up to one month without losing quality.
When ready to enjoy, allow the bars to thaw in the refrigerator or at room temperature for a short time. This helps restore their creamy consistency without making them too soft.
Avoid leaving the bars out at room temperature for extended periods, especially in warm environments. The chocolate layer may soften too much and lose its structure.
Nutrition and Benefits
- These bars provide a satisfying balance of protein and healthy fats from the peanut butter, which helps make them more filling than many traditional desserts. This can make portion control easier while still enjoying a treat.
- The no-bake preparation helps preserve the natural qualities of the ingredients and keeps the process simple. It’s a great way to make homemade desserts without relying on more complex baking techniques.
- Peanut butter contains nutrients like vitamin E, magnesium, and heart-healthy fats, contributing to a more wholesome dessert option. While still indulgent, it offers more nutritional value than many processed sweets.
- Using graham cracker crumbs adds a familiar flavor and texture while keeping the recipe approachable and budget-friendly. It’s an ingredient most families already have on hand.
- These bars can easily be adapted to suit different dietary needs, such as using gluten-free crumbs or alternative nut butters. This flexibility makes them accessible for a wide range of households.
Recipe FAQ
Can I use natural peanut butter?
Yes, but it may slightly change the texture of the bars. Natural peanut butter tends to be more oily, which can make the base softer and less firm. If using it, you may need to add a bit more graham cracker crumbs to help stabilize the mixture.
How do I keep the chocolate from cracking when cutting?
Let the bars sit at room temperature for a few minutes before slicing. This softens the chocolate layer slightly and makes it easier to cut cleanly. Using a sharp knife and wiping it between cuts also helps.
Can I make these bars dairy-free?
Yes, you can substitute the butter with a plant-based alternative. Be sure to use dairy-free chocolate chips as well. The texture and flavor will still be delicious and satisfying.
What size pan works best?
A 9×13-inch pan is ideal for evenly sized bars with the right thickness. If you use a smaller pan, the bars will be thicker and may require longer chilling time. Adjust slicing accordingly.
Can I reduce the sugar?
You can slightly reduce the powdered sugar, but keep in mind it helps bind the base. Reducing too much may affect the structure of the bars. Using darker chocolate can also balance the sweetness without changing the base.
Do these need to stay refrigerated?
Yes, refrigeration helps the bars maintain their structure and texture. At room temperature, they may become too soft, especially in warmer conditions. Keeping them chilled ensures the best results.
Can I add extra mix-ins?
Absolutely, chopped nuts, mini chocolate chips, or even a swirl of caramel can be added to the base. These additions can enhance both texture and flavor. Just be mindful not to overload the mixture so it still holds together well.
Conclusion
These No-Bake Peanut Butter Bars are a simple and dependable treat that come together with minimal effort and deliver consistently delicious results. Their rich flavor and creamy texture make them a favorite for both everyday snacking and special occasions.
With easy preparation and family-friendly appeal, they’re a recipe you can turn to again and again. Whether you’re making them for a gathering or just to enjoy at home, they bring a comforting sweetness that never goes out of style.


