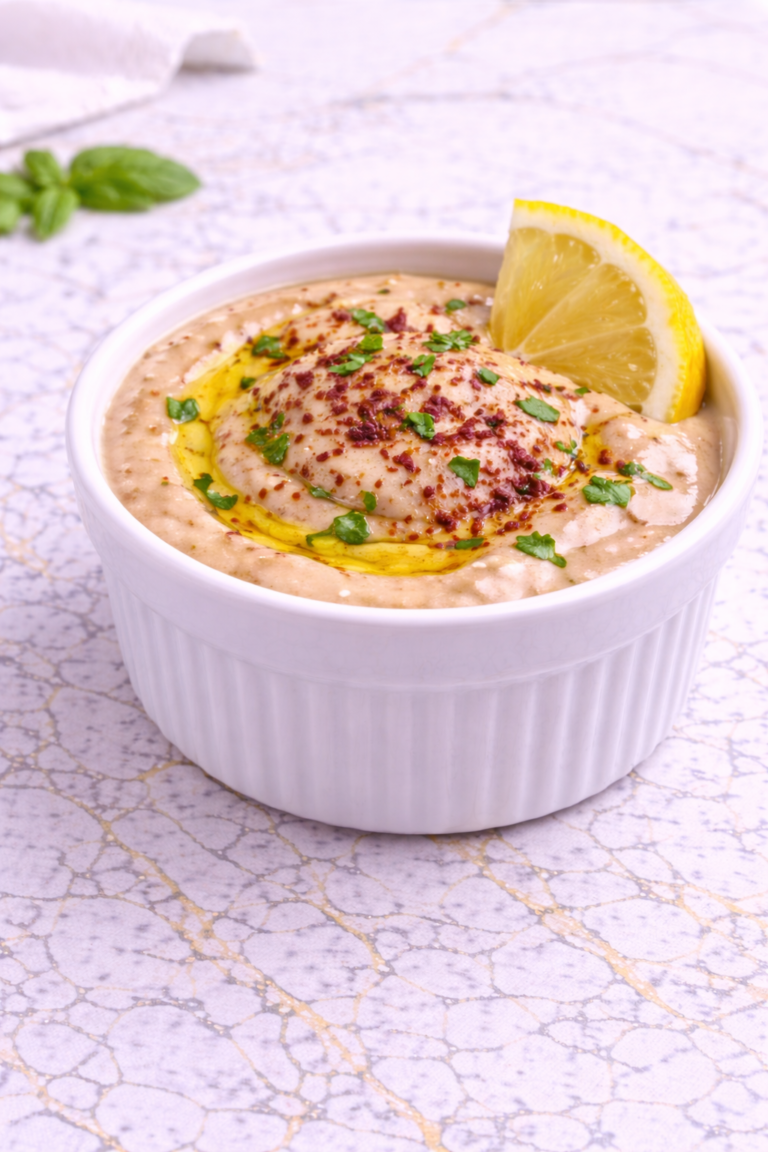
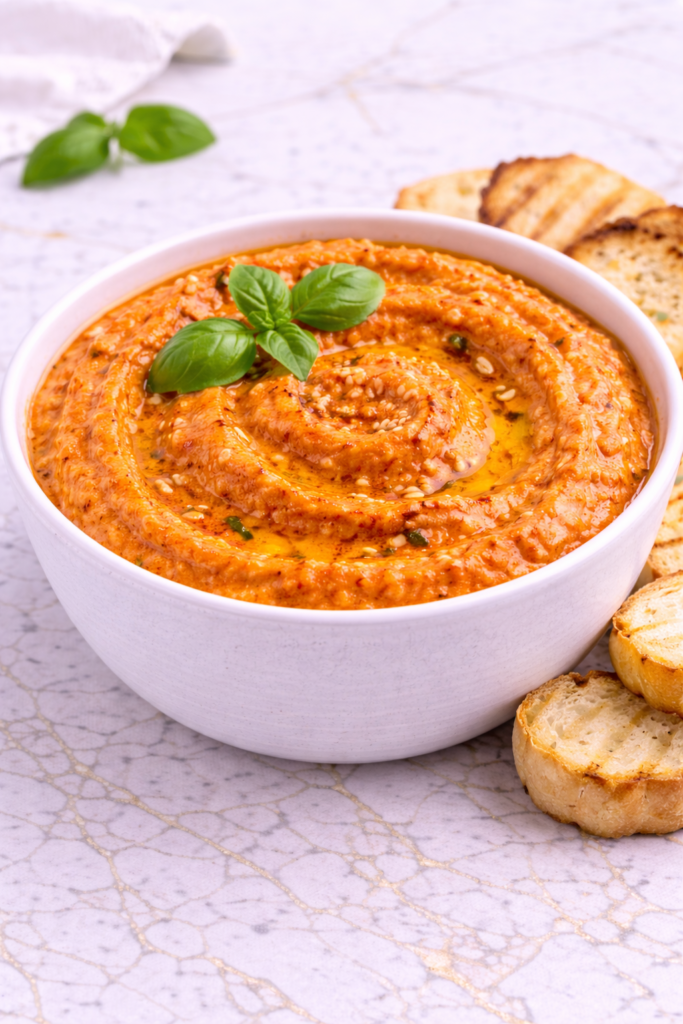
I make this roasted red pepper dip when I need something simple that still feels a little special on the table. It comes together with just a few ingredients, but the flavor feels rich and well-balanced. I like how smooth and spreadable it turns out, especially when served with warm bread or fresh vegetables. It’s one of those recipes that fits easily into both everyday meals and casual gatherings.
At home, this dip has become a steady favorite because it’s easy to prepare and easy to enjoy. The kids like the mild sweetness from the peppers, and I appreciate how flexible it is depending on what we have on hand. It also stores well, which makes it helpful for planning ahead. Once you make it a few times, it quickly becomes part of your regular routine.

Why You’ll Love This Recipe
This roasted red pepper dip has a smooth, creamy texture with a gentle sweetness that makes it easy to enjoy for all ages. The roasted peppers bring a deep, mellow flavor that pairs well with simple ingredients. It feels comforting without being too heavy, which makes it a nice addition to many meals.
Another reason to love this dip is how easy it is to prepare. With a blender or food processor, everything comes together quickly without complicated steps. That makes it a great choice when you want something homemade but don’t have much time.
It’s also very versatile and works in many different ways. You can serve it as a dip, spread it on sandwiches, or add it לצד other dishes for extra flavor. That flexibility makes it useful for both everyday meals and small gatherings.
Serves: 6 people
This recipe makes enough for about six servings, depending on how you serve it. It works well as a shared dip for a family snack or as part of a larger meal spread. You can double the recipe if you’re serving a bigger group or want extra for later.
Ingredients You’ll Need
- 3 large red bell peppers, roasted and peeled
- 1/3 cup tahini or cream cheese (for a creamier option)
- 2 tablespoons olive oil
- 2 tablespoons fresh lemon juice
- 1 small garlic clove, minced
- 1/2 teaspoon salt
- 1/4 teaspoon black pepper
- 1/2 teaspoon smoked paprika
- 2 tablespoons water (as needed for texture)
Optional additions:
- 2 tablespoons plain yogurt for extra creaminess
- A pinch of chili flakes for mild heat
- Chopped fresh parsley for garnish
Pro Tips
Roast the peppers until the skins are well charred for the best flavor. This adds a deeper, slightly sweet taste that makes the dip more balanced.
Let the peppers cool before peeling them. This makes the skins easier to remove and keeps the texture smooth.
Blend the ingredients longer than expected for a silky finish. A few extra seconds can make a noticeable difference.
Start with less liquid and add more as needed. This helps you control the thickness without making the dip too thin.
Taste before serving and adjust the seasoning. A little extra lemon juice or salt can help bring everything together.
Serve at room temperature for the best flavor. This helps the dip taste more balanced and less muted.
Tools You’ll Need
- Baking sheet
- Oven or broiler
- Food processor or blender
- Knife and cutting board
- Measuring cups and spoons
- Spatula
- Serving bowl
Substitutions and Variations
Make It Dairy-Free
Use tahini instead of cream cheese or yogurt to keep the dip fully dairy-free. It still creates a creamy texture while adding a mild nutty flavor.
Change the Base Flavor
Add a small handful of walnuts or almonds for a slightly richer, more textured dip. This gives it a deeper flavor while keeping the core recipe intact.
Adjust the Garlic
Use roasted garlic instead of raw for a softer, sweeter flavor. This is a good option if you prefer a milder taste.
Boost the Texture
Blend in a small amount of breadcrumbs or crushed crackers. This can thicken the dip slightly and give it a more spreadable consistency.
Make It Spicier
Add chili flakes or a small amount of hot sauce for extra heat. This keeps the dip family-friendly while allowing a bit of customization.
Make Ahead Tips
This roasted red pepper dip is a great option to prepare ahead, especially when you want to save time during busy days or when hosting. You can roast the peppers and blend the dip up to two days in advance, then store it in an airtight container in the refrigerator. The flavors settle and deepen slightly as it rests, which makes it even more balanced.
If you’re planning to serve it for guests, prepare the dip ahead and wait to add garnishes until just before serving. A drizzle of olive oil or a sprinkle of herbs helps it feel fresh and inviting. Keeping those final touches separate makes a noticeable difference in presentation.
For longer storage, you can freeze the dip in a freezer-safe container for up to one month. Let it thaw overnight in the refrigerator and stir well before serving. If needed, add a small splash of water or olive oil to bring back the smooth texture.
Instructions
Step 1: Roast the Peppers
Preheat your oven to 450°F and place whole red bell peppers on a baking sheet. Roast for 20 to 25 minutes, turning occasionally, until the skins are charred and blistered. This step builds the deep, slightly sweet flavor that defines the dip.
Step 2: Steam and Peel
Remove the peppers from the oven and place them in a bowl, then cover loosely to let them steam for about 10 minutes. Once cooled slightly, peel off the skins and discard the seeds and stems. This helps create a smooth final texture.
Step 3: Prepare the Base
Add the roasted peppers, tahini or cream cheese, olive oil, and lemon juice to a food processor. Blend for about one minute until the mixture begins to smooth out. Scrape down the sides as needed to keep everything evenly mixed.
Step 4: Add Seasonings
Add the minced garlic, salt, black pepper, and smoked paprika. Blend again until fully combined and smooth. Taste and adjust seasoning if needed to balance the flavors.
Step 5: Adjust the Texture
With the processor running, slowly add water one tablespoon at a time until the dip reaches your desired consistency. It should be smooth and easy to scoop but not too thin. Blend a little longer for a softer finish.
Step 6: Final Taste and Blend
Pause to taste the dip and make any final adjustments. Add a little more lemon juice for brightness or salt for balance if needed. Blend briefly again to combine any additions.
Step 7: Serve
Spoon the dip into a serving bowl and smooth the top with the back of a spoon. Add a light drizzle of olive oil and optional garnishes like parsley or chili flakes. Serve at room temperature for the best flavor.
Serving Suggestions
This roasted red pepper dip pairs well with warm pita bread or soft flatbread, making it a simple and comforting option for sharing. It also works nicely with crisp vegetables like cucumbers, carrots, and bell peppers for a lighter choice.
You can spread it onto sandwiches or wraps to add a smooth, flavorful layer without much effort. It complements grilled vegetables or simple proteins, helping round out an easy lunch.
For a more complete meal, serve it alongside grains, roasted vegetables, or a fresh salad. The creamy texture adds balance to heartier dishes. It also fits well into a casual snack board with a mix of textures.
If you’re hosting, present it in a shallow bowl with a drizzle of olive oil and a sprinkle of herbs. This small step makes it feel a bit more special without extra work.
Leftovers and Storage
Store leftover roasted red pepper dip in an airtight container in the refrigerator for up to five days. Keeping it well sealed helps preserve both its flavor and smooth texture. Stir it before serving to bring everything back together.
For the best taste, let the dip sit at room temperature for about 10 to 15 minutes before serving. This helps the flavors open up and the texture soften slightly. A quick stir can help restore its consistency.
If the dip thickens over time, add a small amount of water or olive oil and mix well. This helps return it to a smooth, scoopable texture. Adjust slowly to avoid thinning it too much.
For longer storage, freeze the dip in a freezer-safe container for up to one month. Thaw it overnight in the refrigerator and stir well before serving. This keeps it practical for meal prep or future use.
Nutrition and Benefits
- Red bell peppers are rich in vitamins A and C, supporting overall wellness while adding natural sweetness to the dip.
- Olive oil provides healthy fats that help create a smooth texture and support balanced eating habits.
- Tahini or yogurt adds additional nutrients and contributes to a creamy, satisfying consistency.
- This dip is naturally gluten-free and can easily be made dairy-free depending on your choice of ingredients.
- It offers a wholesome alternative to processed dips, making it a practical choice for snacks and meals.
Recipe FAQ
Can I use jarred roasted red peppers instead of fresh?
Yes, jarred roasted red peppers work well and save time. Drain them thoroughly before using to avoid excess moisture. The flavor will still be good, though slightly milder than freshly roasted peppers.
How do I make the dip thicker?
You can reduce the amount of added water or blend in a small amount of breadcrumbs or nuts. This helps create a thicker, more spreadable texture. Adjust gradually to keep the balance right.
Can I make this dip without tahini or cream cheese?
Yes, you can omit both and still have a flavorful dip. Try adding a small amount of olive oil or even a few nuts for richness. The texture will be slightly lighter but still smooth.
Why does my dip taste too smoky?
This can happen if the peppers are heavily charred or too much smoked paprika is added. Balance it by adding a bit more lemon juice or a touch of sweetness. This helps soften the strong flavor.
Is this dip kid-friendly?
Yes, the natural sweetness of the roasted peppers makes it appealing to kids. You can reduce the garlic or spices if needed. Serving it with familiar dippers helps make it more enjoyable.
Can I add other vegetables?
Yes, you can blend in roasted carrots or tomatoes for a slight variation. This adds subtle flavor changes while keeping the dip smooth. It’s a simple way to adjust the recipe.
How do I keep the color vibrant?
Use fresh, bright red peppers and avoid overcooking them. Adding a little lemon juice also helps maintain the color. Store the dip properly to keep it looking fresh.
A Smooth and Flavorful Dip to Share Again
This roasted red pepper dip is a simple, reliable addition to your everyday cooking that brings both flavor and ease to the table. It comes together without complicated steps and delivers a smooth, balanced result that works for snacks, meals, or sharing. The texture stays creamy, and the flavor remains gentle enough for the whole family.
It’s a recipe that fits naturally into busy routines while still feeling homemade and thoughtful. With its flexible ingredients and dependable results, it’s something you can prepare ahead and enjoy throughout the week. Having a dip like this ready to go makes everyday meals feel a little more complete.